How to Shoot Smooth Footage with Your GoPro and a DIY Steadicam
If you don't like the material, no worries. I'll give your money back and you get to keep the guide. Guaranteed!
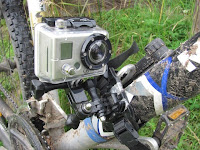
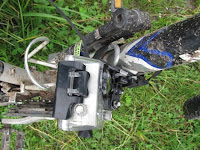
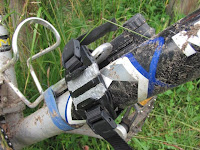
Update: I posted a new article showing you how to mount your GoPro camera on your bike fork using the helmet mount. Everyone these days is interested in either how to make more money or how to spend less money. This post will help you accomplish the latter. If you bought or intend to buy the GoPro HD camera you may not need the Roll Bar Mount ($30) or Handlebar Seat Post Mount ($20) because you can replace them both with the helmet mount that comes in the package. Of course you will need to pull a little harder on those straps in order to get a good fix but that's okay for an improvisation mount. The angle shots you can get depend on your ability to mount the action camera all over your mountain bike - naturally, one place at a time. :-) You only have to carry the helmet mount and the small two-piece arm for implementing the tips below. How To Improvise GoPro Camera Mounts for Your Mountain Bike Using only the Helmet Mount Lateral mount on bike frame, on what is called the down tube. Strap the helmet mount either directly on the tube or use the bottle cage for passing the straps around the thin metal profile. You can have the camera pointed forward - which is great for shooting the road/single-track ahead and the suspension fork at work - or backward - which is cool for shooting the landscape you leave behind, your lower legs and your feet pedaling.


Lateral rear mount on the seat stay and chain stay tubes. This mount is pretty close to the wheel so make sure the loose ends of the straps are knotted or folded as to not be caught in the spokes in any way (don't let them hang freely). Point the camera backwards or forward or even upwards (oblique - this way you can be within the footage frame - you're the star). The moving wheel and the speedy spokes will create an interesting video to watch. You can also bend the small goose-neck arm in order to have the camera below the chain stay, closer to the ground. The upside down footage will be rotated 180° later in your video editor.


Camera mount on top tube. In some bikes the top tube has three small guiding tubes for the metal cables in the rear brake, the front and rear derailleur. These small tubes, the ones below the saddle, are the ones we're referring to. Place the helmet mount on these tubes and the padding material (soft spongy rubber) under the plastic mount will adhere and embrace the tubes granting a firm hold for the camera. If you place the mount slightly offset (not perfectly centered) you will get one arm of the suspension fork in your bike clip.


Lateral mount on the head tube and down tube. The straps go between the top tube and the down tube and around the head tube in variant No. 1. In variant No.2 one strap goes under the down tube and gets out to meet the helmet mount between the head tube and down tube while the other strap starts from under the down tube and wraps the head tube. If I got you confused (with all those tubes) disregard the explanations and study the pictures below. You can get front shots, lateral shots (point the camera outwards, perpendicular on the down tube tube) and back shots.


Seat rails mount (under the saddle). Strap the vented helmet mount around the seat rails under your mountain bike's saddle. Slide the camera onto the mount and you're good to go. Flip the footage in your video editing software.


Upside down mount on down tube. Strap the mount on the down tube, under the frame. The camera can be fixed into place with or without the small arm (footage may be shaky when shot with small arm due to amplification of trepidations - not the case when cycling on smooth surface). Try to shoot upwards for capturing yourself and your bike contrasting against the sky - that's cool!


 There you have it. No need to buy any additional mounts - just use what you have already and do your thing. Extra tip: It's advisable to carry a screwdriver or a multi tool for tightening the screws in the joints of the camera arm. Turning the knobs by hand is not enough. You may easily reach 30 miles per hour while speeding downhill on the single-track - the camera mount must be solidly fixed in place.
| I didn't come up with these ideas. I'm not that smart. These were suggested by fellow blogger and mountain biker Mihai Siman and by Sorin Ciribasa. Oh...and please excuse my dirty bike. Didn't have the time to clean it. :-) |
Thanks for stopping by! Share this article with your friends.


Love your videos - keep meaning to subscribe but haven't yet. Great shoutout to fellow bloggers and idea folks.
ReplyDeleteThanks Kovas! :-)
ReplyDeletehey! i was going to ask you about this..if the helmet mount was usefull in the bike frame!! as you know they send me the motorsports model, and now the helmet mount its way cheeper than the rollbar mount here (almost half price) this article was just i was looking for!! thanks constantin!!
ReplyDeletePD: my video production was stopped coz a injurie in my knee playing paddle :/
Hello Raul! I'm glad you can use to your advantage the info I put up here.
ReplyDeleteI'm sorry to hear about your injury. Stay put until you get better.
Cheers!
Very usefull videos Constantin. :)
ReplyDeleteThanks!
Keep up the good work.
Thanks Adi! I'll do my best to come back with other GoPro HD tips.
ReplyDeleteGreat blog / tips
ReplyDeleteThanks for the tips
ReplyDeleteDo you have any problems with jittery video or the camera shaking on these mounts?
@ J
ReplyDeleteI used to have shaky footage but I solved it with duct tape - I added two thin stripes on the slide-in buckle. The new Hero HD comes with a small orange rubber that's supposed to keep the camera firm on the slide mounts.
All my videos are shot with the duct tape mounts. I never used the orange rubber coz it's just another piece that can be easily lost whereas the duct tape remains in place. :-)
Thanks for the tips.... Here's one for you. Get rid of that stupid reflector so you don't look like such a dork. Your trails must be really easy because a around here a reflector stays on a bike for about 5 seconds of the first down hill.
ReplyDeleteI also ride on the streets at night so the reflector makes sense for me. Looking like a dork is no problem. :-)
ReplyDeleteThanks, just the info i was surfing for.
ReplyDelete