Test Video - Shot with My DIY Steadicam
Everything I know about building a
DIY steadicam is now is in this new
guide. Learn
how to get amazing cinematic video with this cool gadget that you can build using parts from your local hardware store.
If you don't like the material, no worries. I'll give your money back and you get to keep the guide.
Guaranteed!
 |
- Printable PDF document
- Instant Digital Download
- 60 Days Money Back Guarantee
- Prompt Refunds No Questions Asked
- One Time Payment/No BS
- 2 FREE Bonuses:
- How To Build a DIY Camera Slider
- 3 Ways To Get Clients as a Videographer (you'll be surprised to find out what the first method is...)
|
 |
---
Do you have a DSLR camera and want smooth video footage?
As a filmmaker, you're probably interested in getting gliding shots in order to convey that movie-like sensation to the viewer.
-----
Since I'm no longer selling the DIY Highball steadicam, you may wanna check out these other camera stabilizers. Click on any picture.
Check out the stabilizers on
Amazon Canada,
Amazon.UK and
Amazon.DE.
-----
Even though I only own a GoPro HD and a compact camera, I built a DSLR steadicam by simply modifying the camera plates in my
DIY glidecam.
You can place any type of video gadget that has a threaded hole for tripod on this
DIY camera mount.
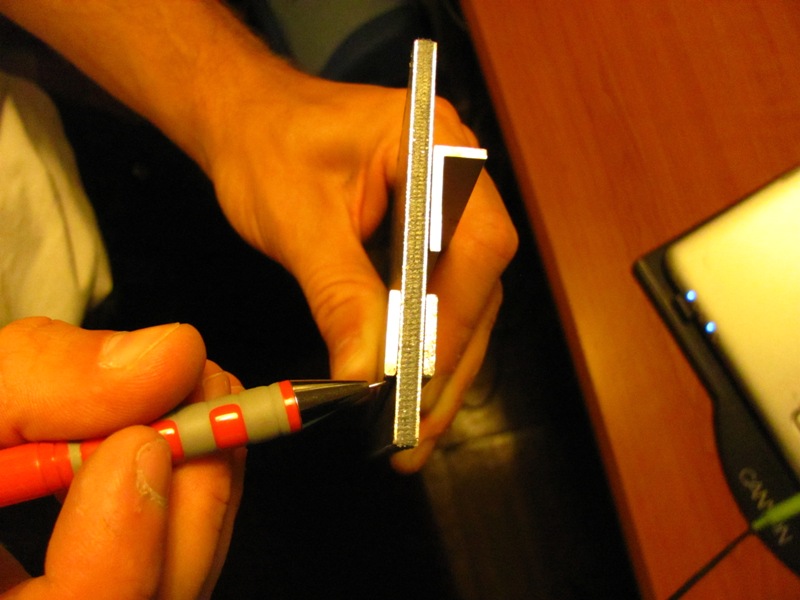
It's advisable to build the plates out of
4 to 6 mm thick aluminum as to have them
sturdy and light. I used a
sandwich type material for the top plate - 4 mm thick, having two outer aluminum sheets and a plastic core.
These sheets are normally used for outside building facades or for interior fixtures.
The brand name (which is used as a generic name as well) for the aluminum composite panel is
Alubond.
It consists of two layers of aluminium skins in varying gloss levels of 30% to 80% sandwiching a Polyethylene or fire rated core. The top surface is coated in stove enameled structural lacquering system and back surface has a mill finish or stove lacqured polyester lacquering system.
I got them on a construction site (hotel) and the workers were masking the elevator door frame with it. One side has a nylon sheet and once you're done shaping and bending your piece, you just peel off the nylon and you've got yourself a clean looking aluminum surface.
The
bolt heads are buried in the top plate. This
enables you to place any type of camera on the stabilizer. The 8 channels take some weight of the plate and also give you more flexibility as to where to place your camcorder.
That's why at least the
top plate must be machine worked out of a thicker material. The rest of the plates can be thinner.
Use 4 bolts and
self locking nuts to assemble the camera mount.
The middle channel in the thinner plate is for the threaded shaft that goes through the
DIY gimbal. The other two channels make the plate lighter and, if necessary (when using and ultralight camera), you can add extra weights (bolts and washers fixed with wing nuts).
If the rig is correctly balanced and yet too lightweight, there may be a problem when flying your camera at faster speeds: the shaft will tilt due to wind. So
keep it a little heavy for good inertia and stable smooth video capture.
To
balance the steadicam, loosen the big wing nut below the thin plate and
slide the camera forward or backward. To adjust the position of the camera, loosen the improvised tripod hole bolt and
slide the camera sideways. You can also turn the camera sideways (lens facing lateral side) if that's how you want to shoot.
I recommend you to have the plates made in a shop so every cut, every hole and every channel is perfectly aligned with the rest of the elements.
If you can't have them made in a shop and don't have aluminum plates (or other similar materials like plastic sheets, etc) you can use laminate flooring. Click on the above image for larger view (you can print it out to have it as a reference).
We could't shoot video with the DSLR (Canon 60D) because we didn't have enough weights to balance it (extra weights were needed for the lower narrow plate).
However,
it is challenging to hold such a heavy rig for extended periods of time. Now that I've tried it, I understand why a vest and an articulated arm are a must for long hours video shooting.
Here are two sample videos shot with this current version of my DIY camera stabilizer:
Shooting video on inline skates for a
bike tricks video project - I took a nice fall.
For more detailed pictures check out my
Facebook album. Feel free to ask me questions in the comments.
Go out there and shoot your outdoor adventures. Cheers!


")