How to Shoot Smooth Footage with Your GoPro and a DIY Steadicam
---
I don't necessarily recommend this setup for your GoPro cable cam.
Why? Because it's not cheap.
We got these professional zipline pulleys from the owner of a zipline park in our home city. It may have helped that we shot a video that benefited him even though someone else was the client.
My point is he's a genuine dude who just wanted to help and he spared us the expense of buying these. They're more than $100 each.
However, if you can get your hands on some second hand ball bearing pulleys, you'll be on your way to building an awesome cable cam rig.
What I like about this design:
- Easy to put on the rope
- Easy to take off (no need to untie the rope)
- Easy to secure (just pop a carabiner and your camera is safe)
Update: As you can see, most of the moving shots are grainy - due to low light in the forest and the Moiré effect. We need better cameras for this kind of shooting.
We also damaged the tripod head, that's why some shots are shaky (the thing became loose due to the numerous shocks and the end of the line). Not to mention that I almost destroyed my compact Sony - the tripod mounting socket started to bulge out (basically my cam would have broken into pieces after another shock).
The image quality is not the best, since my compact Sony HX9V has this autofocus function which is constantly on in video mode. We do have better footage though - taken with a Canon 60D and a GoPro HD 3 Black Edition - but we'll keep that for the final edit.
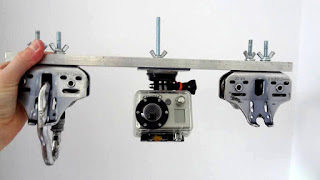
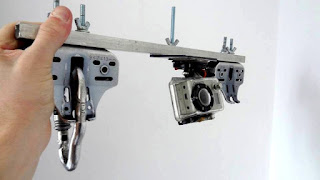
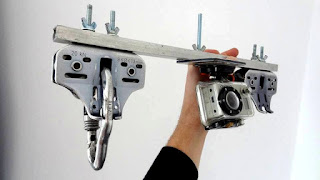
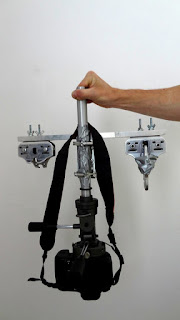
Now that we have the two pulleys mounted 40 cm apart on the aluminum rod, we hope the camera will be more stable. Our plan is to add an arm which will hold a tripod head - thus we'll be able to mount any type of camera on the rig (including a DSLR)
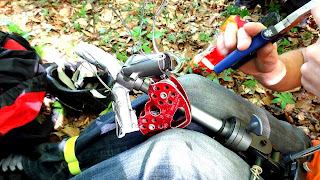
I used to be a climber (I still am I guess, on a limited basis) so I have ropes, carabiners and other gear like that. That helps - we used a 50 meters long 8.5 mm half rope, a Grigri and an Ascension rope clamp to tighten the line.
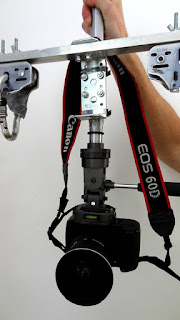
With this extra bracket (see pics below) + the cam that is mounted on it, the center of gravity of the whole rig is below the pulleys. This makes it more stable.
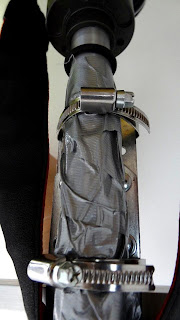
Update: The safest way (that we could come up with) to attach a DSLR was to take the pipe + tripod head and clamp it onto the lateral flat-stock frame. We used two hose clamps for that. The tripod head allows us to rotate and tilt the camera in any direction we want - this helps a lot when you want to frame your subject in a certain way.
Drop a comment if you have questions. Cheers!
Thanks for stopping by! Share this article with your friends.










cool cablecam dude!
ReplyDeletedave
Thanks, Dave! Yup - we love it too. :)
DeleteLike the simple set-up. I'll have to try it out
ReplyDelete/Thomas
Thanks, Tom! Please do and then drop a link with your design.
Deletehow much was the cost for all the materials?
ReplyDeleteNot much. We had our climbing ropes, the pulleys were free so it was just a few nuts and bolts and the aluminum rod (which was from a friend). If you want to build it just like this, the pulleys would make the bulk of the cost.
DeleteDid you drill holes in the pulleys to mount them to your frame? If not, how'd you get the bolts in there?
ReplyDeleteHi Jonny! No, the pulleys had those holes from the start so we just passed some bolts through. We only drilled the aluminum rod.
DeleteHey Constantin!
ReplyDeleteThanks a lot for the great tutorial/demonstration. Do you think your design would work with single ball bearing pulleys as well? I'm thinking about building a cable cam as well but I would go for four single pulleys and two ropes. I would love to hear your input on that.
Thanks and rock on!
Jan
Hi Jan! I don't see any reason why it should't work. As long as the pulleys are with bearings, the rig should run smoothly on the ropes.
ReplyDeleteGreat, thanks for your quick response! I feel like two ropes (possibly a third one for control) makes it all a little more complicated, especially the rigging, but I'll give it a shot. My thought so far is that pulleys or rolls with larger diameters should run more smoothly and possibly not as noisy. Alternatively I'm thinking about sliding door rolls which seem very affordable and also have ball bearings. Another thing I'm not decided about is if the importance of the rope diameter. Most of the smaller pulleys I found are only for up to 5mm and those ropes may be a little rougher.
ReplyDeleteI will first buy some rope to get a feeling for the rigging and then will go from there.
Thanks again!
Jan
Yeah you should try to build with with the materials that you've got available. You gotta bear in mind that this was our first and only setup (with 8.5 mm climbing rope and Petzl pulleys) - we didn't experiment very much since this proved to be working fine.
ReplyDeleteYou have a point with the large diameter of the pulley. :)
Drop a link to some Facebook pics when you have your rig. Also some test footage would be nice. :)
I'm completely aware of the fact that this is an interesting experiment with the materials you had available. Don't wanted to criticize, only wanted to hear your input on possible improvements.
ReplyDeleteAs to my experimenting: today I received four rope pulleys D60mm with bearings and I managed to exchange the three roller skate wheels of my skater dolly with three of the pulleys and the help of available scrap parts like wood and old IKEA screws :). Looks pretty usable at the moment but since I am still waiting for some 4mm rope I'll have to wait until I'm able to rig it and shoot some pics and footage. I'm a little worried about the necessary tension on the ropes for the weight of the dolly and camera. I guess the tension will have to be pretty high so that it doesn't sag or swing too much and I'm not sure if this is a setup one can use conveniently and flexible indoors. But we'll see. I guess this setup should also work on some u-profiles.
I'll keep you posted!
Cheers,
Jan
:) Please do, Jan. Hope it all works great for you.
ReplyDelete