Showing posts with label steadicam. Show all posts

How To Shoot Steadicam Video - Extreme Adventure Clips by Sebastien Montaz-Rosset

Test Video - Shot with My DIY Steadicam


Everything I know about building a DIY steadicam is now is in this new guide. Learn how to get amazing cinematic video with this cool gadget that you can build using parts from your local hardware store.

If you don't like the material, no worries. I'll give your money back and you get to keep the guide. Guaranteed!


  • Printable PDF document
  • Instant Digital Download
  • 60 Days Money Back Guarantee 
  • Prompt Refunds No Questions Asked
  • One Time Payment/No BS
  • 2 FREE Bonuses:
    • How To Build a DIY Camera Slider
    • 3 Ways To Get Clients as a Videographer (you'll be surprised to find out what the first method is...)
Add To Cart DIY Steadicam Ebook
---

Shooting Video with Steadicam

The most entertaining way to learn how to shoot extreme sports videos is by watching the pros, right?

Manuals and books are helpful but we always need a little bit of inspiration and motivation from the big guys.

-----
Since I'm no longer selling the DIY Highball steadicam, you may wanna check out these other camera stabilizers. Click on any picture.
GoPro Smoothee Stabilizer by Steadicam
Glidecam HD 2000
Flycam Stabilizer
Check out the stabilizers on Amazon CanadaAmazon.UK and Amazon.DE.
-----

So here are a series of short video tutorials on hot to shoot steadicam videos by Sebastien Montaz-Rosset, famous for his slack line and wing-suit base jumping videos.

Steadicam video shooting tutorial

How To Build a DIY Steadicam - Simple DIY Gimbal Design

Test Video - Shot with My DIY Steadicam


Everything I know about building a DIY steadicam is now is in this new guide. Learn how to get amazing cinematic video with this cool gadget that you can build using parts from your local hardware store.

If you don't like the material, no worries. I'll give your money back and you get to keep the guide. Guaranteed!


  • Printable PDF document
  • Instant Digital Download
  • 60 Days Money Back Guarantee 
  • Prompt Refunds No Questions Asked
  • One Time Payment/No BS
  • 2 FREE Bonuses:
    • How To Build a DIY Camera Slider
    • 3 Ways To Get Clients as a Videographer (you'll be surprised to find out what the first method is...)
Add To Cart DIY Steadicam Ebook
---

DIY Steadicam
Here is a sleeker design of what can be your universal DIY camera stabilizer. Scroll the page for test videos and detailed pictures.

You can mount any type of camera as long as it's not too large or too heavy. While it's also a DIY DSLR steadicam, I would't recommend using cameras heavier than 1.5 kg (3.3 lbs) on this particular rig.

If you necessarily need smooth video with heavier cameras, you can build a more solid version with a thicker threaded rod as a shaft and a sturdier gimbal with larger bearings.

-----
Since I'm no longer selling the DIY Highball steadicam, you may wanna check out these other camera stabilizers. Click on any picture.
GoPro Smoothee Stabilizer by Steadicam
Glidecam HD 2000
Flycam Stabilizer
Check out the stabilizers on Amazon Canada, Amazon.UK and Amazon.DE.
-----

DSLR Steadicam - DIY Camera Mount Tutorial

Test Video - Shot with My DIY Steadicam


Everything I know about building a DIY steadicam is now is in this new guide. Learn how to get amazing cinematic video with this cool gadget that you can build using parts from your local hardware store.

If you don't like the material, no worries. I'll give your money back and you get to keep the guide. Guaranteed!


  • Printable PDF document
  • Instant Digital Download
  • 60 Days Money Back Guarantee 
  • Prompt Refunds No Questions Asked
  • One Time Payment/No BS
  • 2 FREE Bonuses:
    • How To Build a DIY Camera Slider
    • 3 Ways To Get Clients as a Videographer (you'll be surprised to find out what the first method is...)
Add To Cart DIY Steadicam Ebook
---

Camera Plates

Do you have a DSLR camera and want smooth video footage?

As a filmmaker, you're probably interested in getting gliding shots in order to convey that movie-like sensation to the viewer.

-----
Since I'm no longer selling the DIY Highball steadicam, you may wanna check out these other camera stabilizers. Click on any picture.
GoPro Smoothee Stabilizer by Steadicam
Glidecam HD 2000
Flycam Stabilizer
Check out the stabilizers on Amazon CanadaAmazon.UK and Amazon.DE.
-----

Even though I only own a GoPro HD and a compact camera, I built a DSLR steadicam by simply modifying the camera plates in my DIY glidecam.

Canon 7D Steadicam

You can place any type of video gadget that has a threaded hole for tripod on this DIY camera mount.

It's advisable to build the plates out of 4 to 6 mm thick aluminum as to have them sturdy and light. I used a sandwich type material for the top plate - 4 mm thick, having two outer aluminum sheets and a plastic core.
These sheets are normally used for outside building facades or for interior fixtures.

The brand name (which is used as a generic name as well) for the aluminum composite panel is Alubond.
It consists of two layers of aluminium skins in varying gloss levels of 30% to 80% sandwiching a Polyethylene or fire rated core. The top surface is coated in stove enameled structural lacquering system and back surface has a mill finish or stove lacqured polyester lacquering system.
I got them on a construction site (hotel) and the workers were masking the elevator door frame with it. One side has a nylon sheet and once you're done shaping and bending your piece, you just peel off the nylon and you've got yourself a clean looking aluminum surface.

Alubond Composite Sheets

Camera Plate

The bolt heads are buried in the top plate. This enables you to place any type of camera on the stabilizer. The 8 channels take some weight of the plate and also give you more flexibility as to where to place your camcorder.

That's why at least the top plate must be machine worked out of a thicker material. The rest of the plates can be thinner.

Bolt Head Buried in Camera Plate

DIY Camera Mount

Use 4 bolts and self locking nuts to assemble the camera mount.

The middle channel in the thinner plate is for the threaded shaft that goes through the DIY gimbal. The other two channels make the plate lighter and, if necessary (when using and ultralight camera), you can add extra weights (bolts and washers fixed with wing nuts).

If the rig is correctly balanced and yet too lightweight, there may be a problem when flying your camera at faster speeds: the shaft will tilt due to wind. So keep it a little heavy for good inertia and stable smooth video capture.

Camera Mount for DIY Stabilizer

Camera Plates for DIY DSLR Syeadicam

Gyro Stabilizer

To balance the steadicam, loosen the big wing nut below the thin plate and slide the camera forward or backward. To adjust the position of the camera, loosen the improvised tripod hole bolt and slide the camera sideways. You can also turn the camera sideways (lens facing lateral side) if that's how you want to shoot.

Camera Plates for DIY Steadicam

I recommend you to have the plates made in a shop so every cut, every hole and every channel is perfectly aligned with the rest of the elements.

If you can't have them made in a shop and don't have aluminum plates (or other similar materials like plastic sheets, etc) you can use laminate flooring. Click on the above image for larger view (you can print it out to have it as a reference).

Camera Plate Detail

Camera Plates for DSLR Steadicam

Camera Stabilizer DIY

DIY Camera Mount

DIY Glidecam Camera Plates

DIY Stabilizer

DSLR Camera Stabilizer

Steadicam for DSLR

We could't shoot video with the DSLR (Canon 60D) because we didn't have enough weights to balance it (extra weights were needed for the lower narrow plate).

However, it is challenging to hold such a heavy rig for extended periods of time. Now that I've tried it, I understand why a vest and an articulated arm are a must for long hours video shooting.

Canon 60D on DIY Steadicam

DIY Steadicam DSLR

DSLR on DIY Glidecam

DSLR Steadicam

DSLR Steadycam

Here are two sample videos shot with this current version of my DIY camera stabilizer:

Hanging out with local bloggers outside my city & climbing session - Social Media Brasov

Shooting video on inline skates for a bike tricks video project - I took a nice fall.  

For more detailed pictures check out my Facebook album. Feel free to ask me questions in the comments.

Go out there and shoot your outdoor adventures. Cheers!

DIY Gimbal for DIY Steadicam or How To Build the Perfect Camera Stabilizer

Test Video - Shot with My DIY Steadicam


Everything I know about building a DIY steadicam is now is in this new guide. Learn how to get amazing cinematic video with this cool gadget that you can build using parts from your local hardware store.

If you don't like the material, no worries. I'll give your money back and you get to keep the guide. Guaranteed!


  • Printable PDF document
  • Instant Digital Download
  • 60 Days Money Back Guarantee 
  • Prompt Refunds No Questions Asked
  • One Time Payment/No BS
  • 2 FREE Bonuses:
    • How To Build a DIY Camera Slider
    • 3 Ways To Get Clients as a Videographer (you'll be surprised to find out what the first method is...)
Add To Cart DIY Steadicam Ebook
---


-----
Since I'm no longer selling the DIY Highball steadicam, you may wanna check out these other camera stabilizers. Click on any picture.
GoPro Smoothee Stabilizer by Steadicam
Glidecam HD 2000
Flycam Stabilizer
Check out the stabilizers on Amazon CanadaAmazon.UK and Amazon.DE.
-----

Update: There's a new article where you can learn how to build a GoPro steadicam - it works with compacts and DSLRs as well. Watch the videos below to see my new glidecam design.


This article is part of a series that teaches you how to make your DIY steadicam.

The pictures below and the above construction scheme show you how to make a gimbal for your DIY camera stabilizer. But as simple as it may look, the reality is it's a painstaking work that needs lots of attention to details if you want to get that smooth video footage.

Why am I saying this? Well, I wasn't able to get the steadicam to work properly with this gimbal design (which was inspired by YouTube user realbuggerwatch his clip below). What I mean is this: I didn't execute the work perfectly and I accumulated small errors here and there that ultimately made it impossible for me to balance the glidecam...


I'm currently working on another design (I dropped the cube idea) which includes some machinery work (also a two piece top plate for placing the camera on - sliding in two directions for fine tune balancing). The point is the cube and ball bearings gimbal work fine if you execute it right. Just as realbugger shows you in his clip - even though he admits he went through trial and error before reaching the final version.

Wooden cube and skate bearing

How to make the gimbal

You need a wooden cube and a drill with a spade drill bit and a regular bit: the spade to drill holes for the bearings and the regular one to drill the gaps for the bolt heads and the hole for the threaded bar that goes through the cube.

Spade drill bit

I had the cube made by a friend of mine who runs a furniture business (he has the proper machinery for this kind of work, lathe and all). And I recommend you do the same - look for a local workshop that can do it for you. They have special drilling machines where the piece is being held in a vise and the boring is much more precise. A specialized shop can usually do it better than you and as long as the cost is not prohibitive, you should give it a shot.

The cube has to be perfect in all aspects:
  • each set of faces have to be parallel 
  • respect the 90 degree angle on each corner
  • each hole must be perfectly centered on the face
  • each pair of holes must perfectly aligned so that the skate bearings will be parallel and centered on an imaginary line that passes through them (see the infographic above)

Ball bearing and wood cube

Wooden cube for DIY gimbal

Bolt and ball bearing

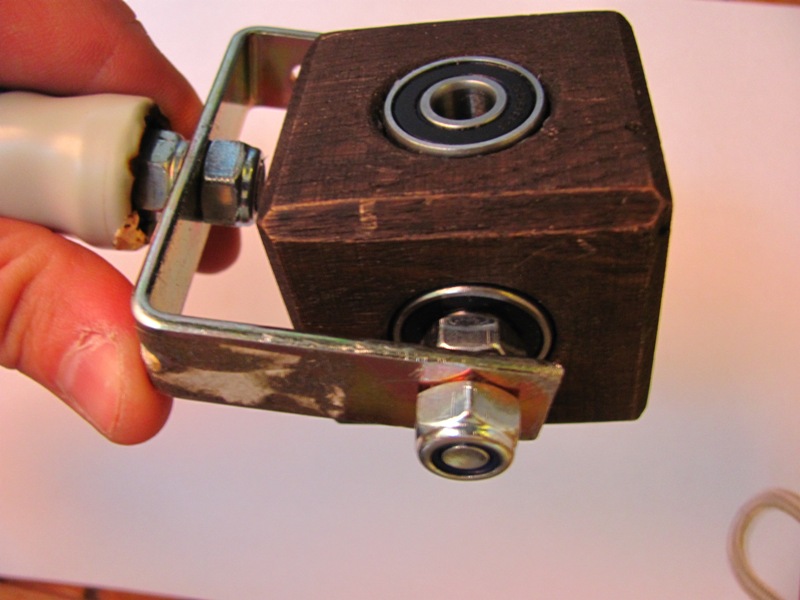
Pass a bolt through each of the bearings on which the gimbal handle will be attached. In my case, the gap wasn't large enough to accommodate the bolt head so I cut it off with a hack saw, leaving just a thin piece (see pic above).

Gimbal from wooden cube

Add a self locking nut on the bolt and tighten it. Now the bearing spins on the bolt. Add some resin glue on the bearing and inside the hole and slide the bearing in the cube. Use a ruler to make sure the bearing is aligned with the surface of the cube.

Do the same with the rest of the bearings. One pair of bearings shouldn't have any bolts in - those will hold the main shaft of the whole rig. Let the glue harden over night.

Ball bearing and wooden cube

Make a frame out of flat stock for the handle. Drill it accordingly on the lateral ends to be placed on the gimbal. Also drill a hole for the handle.

Gimbal handle

Take a PVC 90 degree elbow and heat it above an open flame. Force the bearing in while the pipe is still malleable. Bent the margins as to hold the bearing inside - let it cool down and you're done! Don't forget to prepare the bearing beforehand (slide in on a bolt and add a locking nut).

DIY gimbal

DIY Steadicam gimbal

Assemble the gimbal and you're good to go.

Now just add the main shaft along with the upper and lower weight plates and you've got yourself a new stabilizer. That's the easy part - the hard part is shooting and editing interesting videos. :-)

Steadicam gimbal

Steadicam DIY gimbal

Add duct tape on the bar for a close fit. I used 8 mm thick threaded bar (50 cm long) and bearings with 22 mm exterior diameter and 8 mm interior diameter.

Make a gimbal

You don't wanna tighten the bearings too much on the threaded rod. Actually leave a tiny gap between the bearing and the two nuts tighten against each other that act as a stopper. This grants a free spin of the bearing.

You can also use locking nuts to hold the gimbal in place but the thing is it's hard to thread a locking nut 20 cm on the bar. If you want to move the gimbal higher or lower on your rig (depending on the camera you're using) it's easier to loosen the nuts and then spin then by hand (you need pliers to hold the rod if you wanna do that with the locking nut).

DIY Steadicam

DIY camera gimbal

Notice my previous DIY gimbal in the background. The main advantage with it is that it "auto" adjusts since it has 3 concentric PVC rings - you can't go wrong with it.

However, professional camera stabilizers have a 3 axis gimbal where the movement on each axis is done via a ball bearing which means everything is much smoother. That's the goal you want to accomplish with this design (and with the one I'll be releasing soon).

Steadicam Gimbal in DIY Camera Stabilizer

And there you have it - a DIY glidecam to shoot movie like scenes that'll impress your friends. You'll also get tons of attention whenever you're out shooting videos (people coming to you asking What's that?) :-)

See the full batch of pictures with my project here.

DIY Glidecam for GoPro Camera

Why this didn't work for me

Firstly, I didn't ask my friend to drill the wooden cube as I show you in the infographic above (see top of this post). So each hole was deeper than it should have been.

Because of that, my bearings weren't exactly resting on anything. They were only touching the lateral walls of the bore so my only solution for fixing them was to add the resin glue.

I tried to have them parallel with the faces of the cube but what if each set of faces weren't parallel? Or what if each pair of holes wasn't perfectly aligned nor diametrically opposed? Maybe there were small imperfections in the cube itself which led to other minor imperfections in placing the bearings which also cumulated with...

Bad placement of bearing in PVC pipe handle. The bolt sticking out of the bearing was sightly tilted, which means the bearing was tilted within the PVC handle, etc.

I should mention the metal frame of the handle was imperfect as well. There was more weight on one arm which also caused imbalance and the bends were incorrect: one arm was lower than the other. The two arms weren't within the same mathematical plane.

The funny part was I only became aware of all these issues after I assembled the stabilizer and tried to balance it for more than two hours without any success.

Conclusion

At this point I'm pursuing another design but I may come back to the cube since it's kinda cute and easy to implement. And now I know what I did wrong so that's a valuable lesson about physics and the principles behind this type of gimbal.

I'll be experimenting with custom manufactured pieces coz I want to achieve the best performance possible. Mostly I'm curious if that's the key to perfect balance and optimal work flow when actually shooting video.

Over to you
  • Did you build a camera stabilizer?
  • Do you think it's worth the effort?
  • What other tips can you suggest for a minimalist DIY steadicam design with maximum functionality?http://www.highballblog.com/2011/07/how-to-edit-gopro.html