Update:This was an April Fools Joke. :-) Some parts of the article below are true though. I hope you'll have an awesome spring and a sunny summer full of outdoor adventures.
You may ask why I sold Highball Blog to Demand Media. The short answer is: they made me an offer I could't refuse.
The long answer is: my consulting work and my offline solar panels gigs take too much time so I became rather inactive on this blog. But at the same time I'm happy to share the benefits of outdoor gear sponsorships with a small group of select people who have been writing the reviews lately.
So what's next? Who's gonna run this blog?
Well, I will be here for a while (at least one year). I'll be showing them how this thing works (not that they don't know) but mostly I'll serve as a consultant until the transition is completely made.
1. I usually faint at the doctor. For no particular reason. Well, it happens coz I'm utterly scared - I have a phobia. (Once I even peed myself - I was 25)
2. I got a lot hairier during the last few years - growing on the back and shoulders...ughhhh. I don't like but I have to roll with it.
This is an off topic post to raise awareness about what's gonna happen... If we let it happen, that is.
Basically, the entertainment businesses (Hollywood movie brands and music production companies) are trying to enforce a law that will shut down websites that offer access or information on how to access their copyrighted material.
I've been asked this a lot. By friends, readers, people.
How does a blog make money? How do you make money with your blog?
Money is a byproduct of being helpful
I'm not kissing my own ass here. This is something I really believe in and it seems this blog has been more or less helpful to a certain group of people.
Most of what is written here is a solution to a problem. If it's not a solution, then maybe it's just some advice - bad, good? - you tell me. If it's neither, then it's just personal stuff and I am to blame for stealing your time. Or...am I?
With the explosion of social media and the ease of creating and distributing content, there is an army of bloggers looking to monetize their blogs.
While trying to make money with your blog is, in the end, a legitimate thing to desire, your focus should't be on the money. Yes, earning a few (or a lot) of bucks is nice but you have to see that as a byproduct of what you're doing, not as a purpose in itself.
What this means is you must focus on your audience and create useful, mind blowing, entertaining content and the sponsors will follow.
However, you may be anxious to get your first blog sponsor and don't wanna wait until they come.
So, whatever you're looking for - money, free outdoor gear to review, electronic gadgets, etc. - if you think you have something to offer, here are three ways to get blog sponsorship.
1. Ask for the sponsorship - "Grab It!"
As simple as this may seem, there are a lot of bloggers out there wanting to be sponsored but they've never sent out a sponsorship request via email... How sad is that!?
Gary Vaynerchuk, incredible wine video blogger and social media specialist, says it best in the video above: "Grab It!".
And by the way, if you're a blogger or interested in creating online content of any sort, you gotta read Gary's books: Chrush It! and The Thank You Economy. You'll get pumped and you'll learn that you can actually create a sustainable business with your blog.
Speaking from my own experience, the only reason I got a new winter sleeping bag and a new climbing rope, was because I wrote about 10 emails, got about 5 replies and actually got just one brand to agree and send me gear: Mammut.
What you have to remember is the law of averages and in this particular case this is the law of large numbers which can be translated into:
The higher the number of your trials, the higher chances of you getting a good result.
So start sending out emails to potential sponsors. Tell them what you're all about, what outdoor activities you do, what you can offer, etc. It doesn't have to be ultra formal. As long as it's sincere, brief and concise you might get that free gear or advertising deal you're looking for.
The funny thing is that brands who reached out to me never asked for traffic stats, they simply wanted to sponsor me. But when you are the one reaching out, it's good to give them some figures right upfront so they know what to expect.
Be honest about your stats and be honest about the impact your articles can make.
No one expects wonders from an individual blogger so neither should you. What most brands want is to be mentioned and be online through the voice of individuals. They want you and your readers or followers to talk about them (hopefully in good terms but that's another story).
For your convenience, I reproduce below one of my email requests (sent to Mammut) along with the latest traffic stats screenshot (image that you should normally attach to your email).
Hello,
My name is Constantin Gabor and I'm a climber, mountaineer and blogger from Romania.
I would like to offer advertising space and promotion articles to an outdoor gear brand that can sponsor me with a good wintersleeping bag or a down jacket.
You can get any sort of promotional announcements, product reviews, product placements in YouTube videos, links and banners on Highball Blog and you can also host any kind of giveaway contests.
Traffic Stats for Highball Blog (Jan 19 - Feb 18 - 2011):
1. USA
2. UK
3. Canada
4. Romania (my home country)
5. Indonesia
6. Germany
7. Australia
8. Brazil
9. Philippines
10. India
Visitors are mostly men, interested in mountaineering, climbing, mountain biking, gear reviews and related activities (editing outdoor videos, DIY projects, etc).
I am open to any kind of collaboration according to your current priorities.
I won't take it personal if this sponsorship is not possible.
Thanks for reading this email.
Have a good day!
--
Constantin Gabor
004 07...............
Highballblog.com
info at gabtrend dot ro
Yahoo Msg: catascouts
Skype: constantin.gabor
Highball Blog traffic stats
2. Blog to teach and/or entertain
This is just another way of saying Stay away from personal journal land!
If you're not Lady Gaga or Ashton Kutcher, nobody cares too much about you. Except your family and your friends but they get enough of you already so don't expect them to be your most avid readers.
Avoid writing too much about yourself and keep your content oriented to helping your audience. The only time it makes sense to talk about yourself is if your story is somewhat relevant to what you're teaching.
For instance I talk about myself only when my experience may add value to the topic I'm blogging about. I show you how I edit GoPro HD videos and how I built my DIY climbing hangboard coz I know that's what you want to learn. That's why you land on those pages from search results, Twitter, Facebook or your RSS reader.
And I also respect your option of potentially not being interested in what I blog about. How? By being ultra specific in my posts titles - you know from the very start what the article is about so if you're not interested you can just browse away. That's what you should do with your blogging as well.
For online purposes and for getting sponsors over and over again, a blog that speaks only about your realizations (speed swimming records, fast ascents, high climbing grades you were able to pull, long treks, etc.) is not going to do as well as a blog where the content is more about how readers can solve a particular problem.
If you're doing entertainment, the particular problem you're solving is to bring excitement, laughter and smiles on people's faces, if only for 5 minutes.
If you're a successful athlete, the problem you can solve with your blog or videos is to teach people how to train effectively in order to become as successful as you. And so on.
Spill out your secretes and make your content timeless (evergreen).
By the way, notice that my top posts getting traffic in June 2011 were all written in 2010. They're timeless, educational (notice the How To... and Tips) and searched for.
The whole point here is to serve your readers well. This means having a quality blog which means you have readers which means sponsors are interested in advertising with you. You must remember that sponsorship is not a donation and companies want something in return. They also don't want their name to be associated with poor quality content or the wrong people.
The best way to attract sponsors and advertising deals to your blog is to create content for your audience, not for your ego.
3. Forget about writing, do multimedia & physical products = think multi channel
A smart way to attract both readers and sponsors is to create content in multiple formats:
Videos - easier to consume for your audience and more likely to be shared via social networks
Podcasts - some people prefer to listen to whatever you have to say while jogging so offer your content in audio format
Games - if you're a developer and enjoy building games, do one for the particular topic you're obsessed with
Photos - nature photos or extreme sports shots hosted not only on your blog but on all the other platforms out there
Artwork - of any kind. From hand crafted items to mountain bike shirts designs made with computer graphics software, etc., etc.
Building physical products that people want or need is another smart way of getting attention. The effect is three fold:
You build a product that you need - you get benefits by using it
You can create a tutorial and teach others how to do it (hence the chance to add more content: blog posts - tutorials, videos, pictures, etc)
Your product may have commercial value and you can sell it (especially when your audience specifically ask you to). This happens to me once in while - I get requests via YouTube comments from people wanting to buy a DIY glidecam - it's not for sale yet. :-)
People working in companies looking to find bloggers to sponsor in exchange of online advertising have hobbies and interest as well. If your content is high quality, in multiple formats and hosted across a large number of platforms (Blogger, WordPress, YouTube, Vimeo, Picasa, Flickr, Facebook, etc) there are higher chances you will get noticed.
Personal stories:
I was very close to be an actor in a telecom commercial. All this because some advertising agents & film producers saw a climbing video of mine on YouTube (and it's far from being my best video...). They loved the location. The screenplay of the commercial involved a climber who's phone was ringing so they wanted me to help.
In the end, their client dropped this idea as they were approaching the deadline and the weather turned gray (cold and rain).
Recently (July 2011) I've been contacted by a video producer from Bulgaria who's interested in the raw footage from my cliff jumping and DWS trips. They're doing a video to promote Bulgaria as a tourism destination and my "incredible frames" (their words) may be used in their film.
My point? If you only write text, there's less chances you'll get sponsors or potential business deals.
Now, some deals won't go through but if you want the law of large numbers to work, you have to do your part and throw in those large numbers, be it emails, videos or blog posts.
Conclusion
The global audience is more fragmented than ever and this trend will continue as the internet will become a more important part of our lives, propelling us forward into a global economy with small village rules.
If you start a blog and take your publishing effort seriously, you're basically entering the media business. So it's only a mater of time until you make money with your blog or YouTube channel.
Don't forget to:
Ask for sponsorships
Blog well and serve your audience
Deliver content in multiple formats hosted on different platforms (be everywhere)
Over deliver - both to your readers and to your sponsors
What about you?
Do you have any other tips for attracting sponsors to your blog?
How long did it take you to get your first sponsorship of any kind? It took me about 10 months of blogging and the sponsor was GoalZero.com - they still sponsor me with solar gear.
Apart from writing articles, what's your next preferred format and why? I love to do adventure videos mostly because I have to "strive" for creativity and I think that's a good process for me. It's also hard work and that brings a sort of discipline with it - another perk of the trade. :-)
This is the most rewarding reason for which I like to write and post stuff on Highball Blog - receiving emails like the one below:
Hey Constantin guess what? I came home from work today and found an envelope on my door step. I thought "I didn't order anything", "What's this for?, It's got my name on it, maybe it's a letter bomb?"
I opened it up and the letter said:
Congratulations on being a contest winner on Highball Blog. We hope that you enjoy your prize! Please check out our full line of climbing gear and accessories at www.appoutdoors.com.
Sincerely, Amy Nelson, web depart. manager
Wow! A nice Black Diamond, 7kN, screwgate, aluminum 'biner. It is sweet! That was a contest worth entering :) Thanks for letting me know to enter.
In this article you'll learn the most important SEO (search engine optimization) practices when it comes to uploading pictures to your website or blog. What you'll get is more traffic to your blog from Google Image Search which basically means more visitors, more subscribers and, why not, more money from advertisers.
Too many bloggers (especially beginners) are doing this wrong and they keep asking why their blogs aren't getting the desired traffic?! Well, it's all about the reader, isn't it?
Let's start with you. When was the last time you typed in Google's search box something like IMG.00543? Or JPEG.23? I'll take the liberty to answer that: NEVER (or maybe just 0.01% of the times).
You are just another consumer of information like any other internet enthusiast. You really shouldn't look further than yourself to discover a pattern of how people think when they're searching for something on the web (be it images or webpages).
Have you ever wondered how does Google and other search engines know what images to render for a specific query? It is because the webmasters and bloggers who run those websites (displayed in the search results) did 3 simple things to tell search engines what their images are about.
To have a sense of how much you need to implement the SEO for your images, ask yourself this question:
Do I use lots of photos/images in my blog?
If you're running a photography blog then the images are a big part of your website. If you write highly specific articles on DIY projects and gear reviews then again you're likely to use pictures for accompanying your written explanations. If you're an artist then your paintings, graphic designs and hand made items are all presented on your website through pictures.
So here are the three smart rules you need to follow when adding images to your blog:
1. Give a proper filename to your picture.
Leaving your photos or graphic images untitled is just not good... IMG.00543 doesn't mean anything even if the picture is one of the greatest mountain landscapes ever caught on a DSLR camera.
What you can do instead is give a relevant, keyword rich filename to your images. Keep the filenames as short as possible (up to 5 words) and think about the words you'll use if you'd like to find such a picture in the image search results - use those words in the filename.
Example: climbing-free-solo-el-capitan.jpg or mountain-bike-vector-t-shirt-print.png
You don't have to use hyphens between words, you can leave blank spaces without any loss in terms of SEO. Remember that using underscores (like_this) is interpreted as if the whole title is a single word. However, you'll find images in the search results that have their filename words linked with underscores so the sigle word thing doesn't always apply.
Highball Blog works with blank spaces or hyphens and it seems to work beautifully for all the free vectors.
2. Use the alt tag in the HTML code of the picture.
The alt tag or the alt attribute of the image is the piece of code that tells browsers and search engines what your picture is about. That is of course if you describe your picture well within the inverted comas (the value of the alt attribute is the text description that you must add).
Remember those times when your internet connection was too slow that the images didn't load? In some cases, instead of the images you got blank white squares with some text in each square. Those pieces of text are the alt tags. If the images didn't have alt tags you would see just their filenames (too many times, names like IMG.00543 which didn't tell you anything about the content of the picture).
Example: alt="Climbing Vector Design for Your T-shirt" or alt="Deep Water Solo Climbing in Bulgaria"
Even if your readers can't see your images, at least they have a hint about the content so they'll have a reason to come back later (when the internet connection is better).
Just like the filenames, keep the alt tags short and relevant and try to use synonyms. That is, don't copy the filename in the title tag.
Example: filename DIY-glidecam-for-GoPro-camera alt="Home Made Steadicam for GoPro HD" These two pieces of text are different but they convey the same message: the picture shows a do it yourself camera stabilizer for GoPro.
The ideea is this: use simple words that your readers are likely to type in the search box when they are looking for a solution to their problem.
Matt Cutts Discusses the Importance of Alt Tags - Video
3. Add a title attribute to your image
The title attribute of the HTML image code is the message you see when you hover your mouse cursor over an image (or link). This is the only text, attached to the image code, that your readers will see, so use it as a way to communicate with them. Offer an explanation just like you would in a caption.
Example: title="Google Image Search for Mountain Bike Vector"
Scroll up to the begging of this post and you'll see this title suggestion when you place the hand cursor over the image. The image shows the results for mountain bike vector.
Now, you may ask: What the hell is an alt tag?!?! And the answer is: you don't really have to know. As long as you know what it does (tells search engines what your picture is about) and you use it correctly, you'll get more traffic to your blog.
Adding the alt and title attributes means you have to work within the HTML view of your blogging software. You'll do this after you upload the picture. The final result (in Blogger) should look like this:
<a href="https://blogger.googleusercontent.com/img/b/R29vZ2xl/AVvXsEjeLHEn_i-b7BZ9QulzxQwioudkK_tckD80H6S9L-QXhoerqFcC_KOaoE3bLV8561wV3E8pprwkUpfjFFC6PiaoX8HCeeSPX8Xb5ng0DGSCjKiNGuvJX7X46fB7JdreXIfGdCYvZKSNJgcO/s1600/MTB+Vector+Google+Image+Search.PNG" imageanchor="1" style="margin-left: 1em; margin-right: 1em;" target="_blank"><img alt="SEO for Images - Google Image Search" border="0" height="206" src="https://blogger.googleusercontent.com/img/b/R29vZ2xl/AVvXsEjeLHEn_i-b7BZ9QulzxQwioudkK_tckD80H6S9L-QXhoerqFcC_KOaoE3bLV8561wV3E8pprwkUpfjFFC6PiaoX8HCeeSPX8Xb5ng0DGSCjKiNGuvJX7X46fB7JdreXIfGdCYvZKSNJgcO/s400/MTB+Vector+Google+Image+Search.PNG" title="Google Image Search for Mountain Bike Vector" width="400" /></a>
The green code is of no interest to us now. This is the link that leads to the picture shown in full size (opens in a new tab). The orange and red lines of code are the alt and title attributes of the image tag (<img ... />).
Remember that this works with any what type of blogging software you may use: Blogger, WordPress, TypePad, Tumblr, Posterous, etc. If you're not publishing your content on a blog and you have a custom build website, the image SEO tips still apply. Actually, Google advises webmasters to have clear descriptive alt tags for their images.
So there you have it. Apply these three SEO tactics for your images and you'll get more traffic to your blog from Google Image Search.
If you have more than one picture in your Blogger posts then you may wanna have those images open in new windows or tabs. The default setting with Blogspot blogs is to open the picture within the same tab, forcing your reader to go back and forth from full article view to picture view.
So let's dive in and learn how to open pictures in new tabs with Blogger:
What you need to do is to upload an image to your post editor and switch to Edit HTML.
Notice the content between the first pair of HTML brackets "< a href= ...... >".
Add the following attributes according to your desires, before the closing braket (>): target="_blank" (opens item in new tab) or target="nw" (opens item in new window).
Publish your blog post and you're done.
Now your blog visitors will be able to read your articles and view pictures in new tabs whenever they click on them.
The code below highlights where you must ad the target attribute.
A favicon is something that you've perhaps seen but didn't know it has a name. That was me a while ago. After a few attempts (trial and error) I managed to add a favicon to Highball Blog and in this post I'm gonna teach you how to do it on your Blogger/Blogspot blog.
Favicons are those small images that you see in the browser's address bar, shown before the URL of a website or blog. Not all websites display them but those who do are more likely to make a favorable impression on the viewer. We've got so used to see logos attached to any kind of venture that favicons are their normal extension on the web - in the browser to be more specific.
Let's get to the point and see...
How You Can Add a Favicon to Your Blogger Blog
Before jumping into technical stuff let's agree that you need to design a logo for your blog. And when I say design I don't mean you have to create a masterpiece in seven colors, gradients and textures. No! It's all about simplicity.
If you think your blog should get an original symbol logo then create a logo but in most cases - especially with personal blogs - having your name's initials in a small square or circle will do.
Tips for logo design:
Work with three colors maximum
Use solid colors (no gradients, no textures/pattern fills)
Use simple shapes
Work with few elements (don't crowd the logo with too many shapes)
Make sure your logo looks good in black and white too
Think about it from a branding perspective (make it memorable)
Create the logo in an image editor/computer graphics software that you're familiarized with. If you don't have such software installed on your computer then I suggest you go and download Inkscape - an open source vector graphics editor that competes with major expensive software.
Save your image as PNG file.
Now you need to resize your image. You can do that with Microsoft Office Picture Manager in a few easy steps:
Open your file
Hit the Edit Pictures button
Click Resize (the right sidebar menu)
Enter 16 in the Custom width x height fields (favicons must be 16 pixels wide/16 pixels tall for a proper display in the browser's address bar)
Click OK
Save your new image with a different name as to not replace it with the original one (Save as... - name-of-file-16-px.png)
Click on the image below for a visual explanation of the process.
Once you have the new resized image you must host it somewhere online. I recommend Media Fire as it's free, reliable and convenient. Create an account and upload your image. Note that you can use Media Fire for sending files to people or for storing your own important documents - it can be an alternative to Dropbox (not that smart as Dropbox but good enough for this purpose).
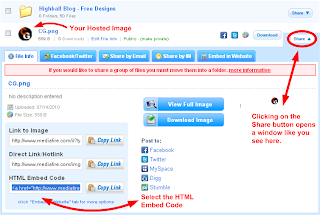
After you upload the picture to Media Fire go through the following steps:
Click on the Share button to see all the sharing options
Copy the HTML Embed Code and paste it into a Notepad blank document
Look for the piece of code that looks like this: img src="http://www.mediafire.com/imgbnc.php/325ea55e0637fca99dc362b7970078862g.jpg"
This particular piece of code (purple line) is the link of your image hosted on Media Fire; img src stands for Image Source
Copy the code within the inverted commas and paste it lower in your Notepad document as you'll need it in the next step. Please note that your code will be different that mine!
See image below (share options in Media Fire)
In this step you will add the favicon to your Blogspot blog.
Log into you Blogger account - go to Design/Edit HTML
Search the end of the title tag, that is </title>
Paste this code just after</title>: <link href="%27http://catascouts.googlepages.com/HighballblogsymbolPNG16.png%27" rel="'shortcut" type="'image/png'/">
Replace the red line with your favicon source code (purple line) that you saved earlier in the Notepad document
Click Save Template
Done!
Note that Highball Blog runs on Three Column Minibox Template which I downloaded from here. If adding the favicon doesn't work on your current blog theme, you may find other solutions in these Google search results.
This article will be added to the list you can see in the right sidebar called Tutorials for Bloggers. If you think these technical posts on blogging belong somewhere else, let me know and I'll create a separate blog just for that. I tend to mix these two topics - internet and outdoor activities - as I love them both. :-)
If you want to change the theme of your Blogger blog, now it's easier than ever! Blogger in Draft is a service from Blogger that allows users to test upcoming features of this free blogging platform. You can log in to Blogger in Draft using your Google or Blogger account and benefit from all the new cool stuff that's being prepared.
Even though the tested features are only available there, the changes you make to the blog's design apply permanently to your Blogspot blog. So before you make any changes, save your current layout if you'd like to switch back to your old template later.
With the new template designer you can:
create new columns for your blog (two columns or three columns blog)
create new columns in the blog's footer (split footer column, add extra fields)
adjust the width of any column by sliding a marker (see the changes take effect in real time)
add a background image to your blog (choose from lots of quality pictures and patterns hosted on iStockphoto.com - nature, sports, travel, science and other categories)
15 new, highly-customizable templates from our design team, split into four families: Simple, Picture Window, Awesome Inc, and Watermark
One-, two-, and three-column layouts for each template, with complete control over the size and arrangement of the columns
Hundreds of background images and patterns from iStockphoto, the leading microstock image marketplace
Try it Now Go to http://draft.blogger.com/ to log in to Blogger in Draft. (If you’ve never been there before, Blogger in Draft is just like regular Blogger, except with new, in-development features like this one.) Click on your blog’s “Layout” link to go to the Layout tab. The link to the Template Designer is at the end of the row of sub-tabs.
With these new design options, Blogger gives you more control over the look of your blog - just like WordPress premium themes. I still wonder whether a blogging platform, given the same content, can make a difference in a blog's traffic... What do you think?
Do you notice something wrong with the video below?
It's not displayed correctly - the video window is larger than the content column. So how can one change this?
First, you should know the width of your posting column in your blog (Blogger, WordPress or other blogging platform). If you use Blogger then you can find this easily by viewing the HTML structure of your blog: from dashboard go to Layout/Edit HTML. Press CTRL and F on your keyboard and type "#main-wrapper" in the search box. The browser will highlight the text for you and you'll be able to see the width of the main column - see picture below, 430 pixels in my case.
Now that you know the width of the content area you can work on adjusting the dimensions of the video for proper embedding and a neat display. Before doing that let's look at the HTML code of the video and understand it:
The red and green lines of code represent the size of the video - the height and width in pixels. What you need to do is change the values within the inverted commas to the values you need your video to be displayed in. In my case I need to adjust the width to 430 pixels and in the same time I must keep the proportions of the video window.
In order to know what the new height will be - I know that the width must be set to 430 - I'll do some math:
Finding out the proportions of the video: 480/295=1.62
Finding out the new height: 430/1.62=265.4 ~ 265 (will work with round numbers)
Verifying if the new dimensions respect the original proportions: 430/265=1.62 OK!
If, for example, the video is smaller than the space available for posting then you may want to align your video either in the center, left or right of the column. In the examples below I will use the same video but I will make it smaller by modifying its dimensions.
An image map is nothing more than a clickable image that can replace, in this case, your Facebook or Twitter button.
The best aspect of an image map is you can define more clickable areas within the same image. Also you can define the shape of each area - circle, square/rectangle, polygon, etc. - and you can ad a title suggestion as to inform your readers about the landing page they will be taken to if they click on a certain area, on the image. The title suggestion is shown if one hovers the mouse cursor over the image.
Being able to create an image map for your social media accounts gives you more freedom to add your personal touch to, otherwise, a standard button. As long as you have an image editor you can do anything you want.
You should be aware that the image map can help you spice up your blog or website in various other ways. Let's say, for example, you have a blog about guitar lessons and you notice that readers tend to read three major posts. If you want to give your fans a faster and more intuitive way to get to those three posts, you can do it by creating an image map and placing it on the top of your sidebar. The image may consist of three symbols that each relate to the topic of a particular post, thus your readers will be visually urged to click on the image and read your guitar tips and tricks.
Here's the image map (and the HTML code) I use for my social media:
<img src="http://www.mediafire.com/imgbnc.php/6fa44b98b043e2d85bd3a2f070e5d74b4g.jpg" border="0" usemap="#Social_Media_Connect" />
<map name="Social_Media_Connect">
<area href="http://www.facebook.com/profile.php?id=563019460" target="_blank"shape="rect"coords="0,0,55,51" title="Connect with Me on Facebook" />
<area href="http://twitter.com/highballsport" target="_blank"shape="rect"coords="55,0,109,51" title="Follow Me on Twitter"/>
<area href="http://www.youtube.com/catascouts" target="_blank"shape="rect"coords="109,0,220,51" title="Visit my YouTube Channel"/>
</map>
And here are the explanations:
The red line represents the link where the image is hosted. I use Media Fire for image hosting. I recommend you to sign up with them and host your images on your own account. If you take the code above (including the image link) and, for some reason, I delete my image later from my Media Fire account then you'll end up with a blank space instead of the social media image.
The blue lines represent the URLs from my social media and YouTube channel. Replace these lines with your URLs, unless you want your visitors to land on my pages :-).
The green lines are the suggestions that users will see when they hover their mouse cursor over your image. You can add whatever message you want but try to be brief and relevant.
The purple lines define the shape of the clickable areas, in this case rectangles.
The orange lines represent the coordinates of the clickable rectangles. The values indicate where a rectangle starts and where it ends by plotting the upper left corner (first two values) and the bottom right corner (the last two values). Use the syntax coords="left, top, right, bottom" and view the image below for better reference.
The gray lines are the attributes of the area/anchor tags ( <area/> - <a>....</a>) that enable pages to be opened in new windows or new tabs in your web browser. The target="_blank" attribute can be used every time you add a link if you want to open the target page in a new window; Blogger doesn't have this option so you have to do it manually for each link in your post, in HTML view. Example: <a href="http://www.highballblog.com/" target="_blank">Highball Blog</a> - this piece of code will open Highballblog.com in a new tab (in Mozilla Firefox).
Give it a try! And if you want a colorful image for your social media image map then copy the PNG at the beginning of this post, have it hosted somewhere and use the above code as explained. Please note that the image width is 220 pixels.
For more information on how to create image maps visit this site.
You may want to have your own domain for your your Blogger blog. If you didn't know, Blogger allows you to switch to a custom domain, thus letting you have your very own URL that will point to your blogspot articles.
Here are a few advantages of going for your .com blog:
You can choose the name of your site without the .blogspot tag
Shorter URL means people can remember more easily your site's address
Own domain allows you to build a trustworthy brand around yourself or around your online business
The value of your purchased domain will rise along with the popularity of your blog
You can later resell your domain for a profit
Other tips:
Make sure to purchase variations of your domain and also buy the .org and .net domains (there is no difference between these domain extensions - your site's content will be the one and only tool in getting you to the top of Google search results)
If you want to own domains without your personal info being shown in the Whois database then choose the private option when purchasing your domain
I used GoDaddy.com for purchasing Highballblog.com so here are the instructionsto switching from blogspot.com to custom domain:
To point your Blogger blog to your domain, you set up domain mapping, which configures your blog settings and domain. You update your settings in your Blogger account and Domain Manager (in GoDaddy.com), as follows:
Park the domain you want to use with your Blogger account. Your domain must be parked with our parking nameservers before you can configure the CNAME record to point to the Blogger account you want to use.
Edit the "www" CNAME record for the domain you want to use with your Blogger account. This tells the Web browser to open your Blogger blog when visitors enter your domain URL in the browser address bar.
Forward your domain to use "www". This ensures your Blogger blog displays for visitors who go to your domain with or without the "www" prefix. For example, it displays for visitors who entered both www.coolexample.com and coolexample.com.
Configure your Blogger account to use your domain.
Use the checkbox to select the domain you want to forward to your Blogger blog.
Select Forward, and then click Forward Domain.
Select http:// or https:// depending on your server settings. For more information on HTTP and HTTPS, see HTTP vs. HTTPS.
In the Forward to field, enter the complete URL, with the "www", to which you want to forward your domain name. For example, www.coolexample.com.
To view additional options, click the Advanced Options hyperlink.
Select one of the following:
Forward Only
Specifies the length of time for this forwarding setting. Select one of the following Redirect types:
I am permanently forwarding my domain — Redirects to the site you specified in the Forward To field using a "301 Moved Permanently" HTTP response. The HTTP 301 response code tells user-agents (including search engines) that the location has permanently moved.
I am only temporarily forwarding my domain — Redirects to the site you specified in the Forward To field using a "302 Found" HTTP response. The HTTP 302 response code tells user-agents (including search engines) that the location has temporarily moved.
Forward with Masking
Prevents the forwarded domain URL from displaying in the browser's address bar, and lets you specify Meta Tags for search engine crawlers by completing the following fields:
Title — Displays at the top of the browser window and in search results.
Description — A short description of your website to display in search engine results.
Keyword — A list of comma-separated keywords that describes the content and purpose of your website.
Click OK.
To Configure Your Blogger Account
Log in to your Blogger account.
Go to the Settings tab.
Click Publishing.
Click the Custom Domain hyperlink.
In the Buy a domain for your blog section, click the Switch to advanced settings hyperlink.
In the Your Domain field, enter your domain name. For example, enter www.coolexample.com.
To specify another location in which to look for files, in the Use a missing files host? section, select Yes and enter the path. If not, specify No.
In the Word Verification field, enter the characters as they display in the image above the field.
How To Master Your GoPro Camera Like a Pro (even if you don't know anything about shooting or editing videos)
+ How To Make Money on YouTube (Bonus Section)
Don't freak out! I hate spam too.
Your email is safe with me.
+ You'll Also Get These Extra (FREE) Materials:
How To Get Free Outdoor Gear from Sponsors
How To Make Viral Videos - 3 Lessons from Devin Graham (King of YouTube)
3 Cool Ways To Get Paying Clients as a Videographer
How To Be Creative without The Pressure
You Don't Have To Struggle To Learn How To Shoot and Edit GoPro Videos on Your Own. Take The GoPro Video Editing Course and Easily Publish Your First Video without Mistakes.
Hi! My name is Constantin and I'm an outdoorsy dude who enjoys shooting and editing action sports videos. Here you can learn GoPro tips, how to build DIY video gear and you can also read our outdoor gear reviews. More about me here.
Testimonial
GoPro (the company) on my DIY Steadicam Tutorial:
"An advanced How To for the hardcore film makers"