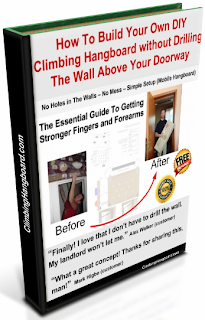
If you don't like the ebook, no worries. I'll give your money back and you get to keep the book. Guaranteed!
Printable PDF document
Instant Digital Download
Construction Schemes and Detail Pictures
3 Hangboard Versions To Choose From
Acess To My Video Tutorials
Sequenced Training Schemes
60 Days Money Back Guarantee
Prompt Refunds No Questions Asked
One Time Payment / No BS
+ 3 Extra Bonuses (see below)
You Also Get 3 FREE Bonuses - Climbing T Shirt Designs:
Deep Water Solo T-shirt
Highball Bouldering T-shirt
Top Rope Forbidden T-shirt (Funny)
---
Perhaps you've wondered how those sport climbing routes are created.
It's not very complicated actually. The real problems are time and money - the hangers and ring-chains are not cheap. And I guess time is not cheap either.
If you're in the process of bolting a multi-pitch climbing route and want to save some cash, here's a picture to inspire you: DIY belay station with anchor (hanger) and screw link for rappelling.
All you need is a stainless steel flat-stock which you need to drill and bend. So you get a double bolted belay station at the fraction of the cost.
I received an email from a PR team that handles the Degree (antiperspirant) brand.
They asked me to post this video on the blog. I replied that this is not beneficial in any way to the visitors of Highball Blog. It's well produced but it's a commercial. They din't reply.
If you don't like the material, no worries. I'll give your money back and you get to keep the guide. Guaranteed!
Printable PDF document
Instant Digital Download
Construction Schemes and Detail Pictures
3 Hangboard Versions To Choose From
Acess To My Video Tutorials
Sequenced Training Schemes
60 Days Money Back Guarantee
Prompt Refunds No Questions Asked
One Time Payment / No BS
+ 3 Extra Bonuses (see below)
You Also Get 3 FREE Bonuses - Climbing T Shirt Designs:
Deep Water Solo T-shirt
Highball Bouldering T-shirt
Top Rope Forbidden T-shirt (Funny)
---
One of the best ways to make your kid a responsible person is to treat him/her like an adult.
Now, I don't have kids of my own but I've noticed there's a difference in behavior when you treat the kids like one of your own (adults that is).
Me and my 12 year old cousin have been best friends since she was 5. When she was 6 years old, I took her with me on a 10 story building and she sat there enjoying the view while I was working on a billboard, hanging from a rope. Maybe I was was crazy (wasn't my child so why worry, right?) but I saw how my other young cousins develop with less permissive parents - there's a difference and not necessarily to the kid's advantage.
So one of the ways to actually empower your child is to let the kid go climbing and grant him/her the freedom to act and explore as if he/she was a full grown up.
You may have noticed that there's a trend to wear more and more fashionable clothing when climbing.
Just go into a mountain store and you'll find a piece of climbing clothing for everything: bouldering, alpine climbing, whatever.
While I'm not particularly a fashionable guy, I do enjoy a good pair of pants to wear during my redpoint attempts. So I figured to share with you this cool infographic and video made by Tristan Higbee on his Daily Climbing Tips blog.
He discuses how to choose the perfect climbing pants:
Pay attention to fabric - synthetic light fabrics that wick moisture are preferable (even though there's a tendency to wear cotton as well - especially among bouldering enthusiasts)
Choose zipper pockets if possible - you may wanna carry small important items with you (such as a printed top or a candy bar
Get the right fit - that's something each of us should decide for ourselves what it means. The point is you don't wanna trade your ability to move for looking good.
If you're also a blogger and wanna learn how to blog like a rock star, you should also check out Tristan's main blog - BloggingBookshelf.com where he teaches blogging tips for smart people. He's got incredible quality content - that's my vote for him!
Mammut, the outdoor gear manufacturer, comes at you with a wicked opportunity for their 150th anniversary:
Get a chance to be part of the Ultimate Testevent and climb one of 150 mountain peaks in the world!
What you need to do
Become a fan of Mammut's Facebook Page (hit the Like button) or subscribe to Mammut Basecamp and find out more about The Biggest Peak Project in History. Spread the word about this as you'll need as many friends as possible from your social networks.
If you don't like the ebook, no worries. I'll give your money back and you get to keep the book. Guaranteed!
Printable PDF document
Instant Digital Download
Construction Schemes and Detail Pictures
3 Hangboard Versions To Choose From
Acess To My Video Tutorials
Sequenced Training Schemes
60 Days Money Back Guarantee
Prompt Refunds No Questions Asked
$ 39.99 $ 27.99 One Time Payment / No BS
+ 3 Extra Bonuses (see below)
You Also Get 3 FREE Bonuses - Climbing T Shirt Designs:
Deep Water Solo T-shirt
Highball Bouldering T-shirt
Top Rope Forbidden T-shirt (Funny)
---
Whether you're at your first multi pitch climb or you're a veteran and climbing an unknown route (oh yes, I preach to you, veteran) there are three pieces of gear you should always carry with you: two half ropes, mobile protection devices and slings.
Two half ropes. Why?!
In the worst case scenario, two ropes are a means to self rescue. If, for whatever reason, you cannot climb anymore (accident, fatigue, thunder storm, etc.) you can get down twice as fast compared to having just one rope. Especially with longer half ropes these days (60 or 70 meters) you can rappel over two or three pitches at once. This saves precious times and gets you faster to safe grounds (literally).
Another reason for climbing with half ropes in multi pitch routes consists of their elasticity. Since they are thinner than single ropes, the shock force transferred to the last anchor point (and the climber) in case of a fall is smaller. And in old routes, where pitons were hammered more than 20 - 30 years ago you don't wanna fall too hard...
Sometimes the route doesn't follow a straight line. If the line of pitons is sinuous then you clip the left rope on the left side pitons and the right rope on the right side pitons. You won't experience any drag and the fall impact will be absorbed properly by the the full length of the rope available from you (lead climber) to your belayer.
When I started climbing I had no idea that three persons could climb a long route, being part of the same team. Two half ropes make this possible - the lead climber ties both ropes on his harness and each second ties himself/herself at the other end of each rope.
Nuts and cams
Oh boy! Do you enjoy long runouts? I don't!
A few meters between bolts in sport climbing lines - that's manageable in terms of emotion (just a fancy word for fear) but when it comes to high alpine walls and old pitons...you wanna have those pieces for extra protection. It's also about comfort of mind. You'll climb better and more relaxed when you're better protected.
Don't mix climbing with ego - your manhood (even if you're a girl) is not at stake when you're climbing - you're allowed to be scared!
Since the pioneers only had pitons, you may find belay stances where the anchor points are rather loose in the large cracks. That's where a bunch of friends come in handy for making a stronger belay. So, always carry a few cams and nuts - you never know where you're gonna need them.
you can make knots on them and use them as nuts (like on the sandstone towers in Saxon Switzerland and Czech Republic where you're not allowed to use metal mobile protections)
use them as prusik knots for securing your abseil or for climbing up the rope
not to mention their versatility in any survival situation
Of course these three gear elements are just part of the arsenal you must take in long alpine routes. Just think about what your biggest fears are and equip yourself accordingly.
The abseil is perhaps the best part of climbing. It's the reward after the strenuous effort of reaching the top. It's what people who didn't do it think climbing is all about - it's the fun stuff.
However, if you want to enjoy the full pleasure of rappelling you must spread your legs... Oh yeah!
Let's talk geometry and make this sound more complicated than it really is. In other words, let's mathematically demonstrate why you need to spread your legs while rappelling. (I do get pretentious and overly scientific sometimes.)
You'll knock yourself out (literally) if you don't spread them
If you've tried to abseil down a rope and kept your feet close together you may have swung either to the left side or to right side, hitting your shoulders against the rock face. This happens for a very simple reason: when your feet are close they act as a single point of contact.
So one point consists of your feet on the cliff and the other point is your anchorage point where the rope is tied - it can be a chain lower off in a route, a tree on the cliff, etc. Now, imagine a line between these two points - this is the axis around which you swing when you have your feet too close (so close that they act as a single contact point).
Why is that? Because two points determine an infinity of planes. As you can see in the image below, the two points are contained both in plane A as well as in plane B. And between these two planes there is that infinity of planes that we've just mentioned above. Rotate either of the planes around the axis made by the two points and you got yourself a new plane.
The axis is represented horizontal but in a real life rappel sitaution this axis is vertical.
Three points determine a single, unique plane
If your legs are spread and your feet are far apart, you enter a new, stable situation. The point on your harness on which you have your descender (abseil eight, Grigri, Reverso, etc.) is a distant corresponded of the anchorage point. That's why we'll consider the third point (see picture below post title) to be on your harness belay loop.
So yes, rappelling with your legs spread gives you more stability. It's a no brainer but the simple geometry lesson is supposed to make you understand the basic principle behind this stability.
There can only be just one plane which contains any three given points in space. Your two feet and your descending device create that plane, preventing you from swinging sideways.
As a beginner climber you will always be tempted to hold both your hands on the rope when you are being lowered by your partner (in top rope climbing for instance). So the usual thing you do when you begin to swing sideways - coz you keep your feet too close to each other - is to grasp even tighter that rope and just wait (or maybe close your eyes and scream as well) to... BANG! You hit the wall with your hip, shoulder and say to yourself: Gee, climbing is dangerous...
Don't feel embarrassed. We all went through it. :-) Remember the three points of contact rule, spread your legs and you 'll be fine.
So, did you enjoy your first abseil? What about your geometry classes?
Seaside cliff jumping and deep water solo climbing (DWS) can be fun activities but there are a few things you should consider before jumping into these sports. So let's dive in.
Yes it looks joyful and splashy but you have to remember that climbing and related sports are considered extreme sports. This doesn't mean you can't enjoy it but make sure you know what you're doing.
If you only want to jump into the sea then you must have these checked:
Make sure you can swim. If you're a poor swimmer you'll struggle to get out, especially if the waves are big. If you can't swim, only enter in still waters wearing a swimming vest - under the close supervision of friends who can swim. Of course you won't be able to jump while wearing the vest but if you insist, do it from a height of two meters (six feet) above the sea or less. Being buoyant (with the vest on) you won't sink deep enough and you may even rip the vest (not to mention the impact shock your body will receive).
Is the water deep enough for a high jump? You don't wanna hit the rocks on the seabed so check the jumping spots before you leap. Don't take chances as this may lead to fatal injuries (broken spine, broken legs, etc). A depth of at least four meters (12 feet) is required for 10 meters (30 feet) jumps. At 8'20" in the video above you can see an injury case which proved to be trivial (minor scratches) but being too cautious is never wrong!
Wear climbing shoes - even if you don't want to climb high cliffs. Wearing shoes has two benefits: you won't splash your feet against the water and you won't cut your sole while climbing out. The limestone rocks are razor sharp below the water line - you won't regret having your feet protected.
Can you maintain vertical balance while airborne? Well...when I jumped from that tower I leaned forward and hit my chest against the water so badly that it took me approximately 10 seconds to recover my breath and to be able to speak (I was basically speechless...). Chris Sharma says in one video (King Lines - scene with limestone arch route Es Pontas) that he heard of people "breaking ribs, collapsing their lungs" - oh yeah, that's definitely possible! Start with small jumps and go for the big air gradually! It's all about maintaining a good vertical balance in midair and tucking your limbs close to your body just before breaking the water surface (apparently I lost the mastery of this...).
Is there an easy way out? If you can't climb too well then you should make sure there's a safe exit out of the sea, like a bay with still water and a stairway-like rock feature. Don't force your friends to save you. We had to do this once and it wasn't fun.
For climbing sea cliffs you must first be accustomed to jumping into deep water. After that you must get used to falling into water when climbing - this means you have to rapidly adjust your body for a proper plunge (feet first). And finally you have to get used to climbing well enough as to have girls cheer at you... - it's not easy being a rock star.
Where's the chalk? 1.Climb without chalk - it works. 2.Carry a dozen of chalk bags (just like Sharma does when he shoots his videos). You will wet one on each time you fall. 3.Apply liquid chalk on your hands and shoulders - when your palm gets sweaty just rub it on your opposite shoulder. This is a neat solution that doesn't imply sacrificing your chalk bag.
Beware of big waves and tight overhanging corners. If you wanna climb that overhang that starts just above the water surface wait for a day when the sea is calm. Don't push it or else...
Loose rocks or thin horizontal holds (slates) may lead to unexpected falls. Choose your climbing route wisely.
Some of my friends explicitly asked me not to reveal online where this place is. Their reasons (and mine as well)?! Whenever a places grows too popular it also grows unpleasant due to traffic, urban sprawl like in real estate development, more trash, more noise, etc. I'll tell you this - it's a small village in Bulgaria. I'm sure the right people will be able to Google all the info.
If you get there please live like a nomad and don't check in in hotels or villas. If you do need comfort however, talk to the owners and tell them it's their responsibility to develop this place without destroying it. Educate them to educate their tourists.
Other things you should know if you're going DWS climbing in Bulgaria:
As a nomad (sleeping in tent or in caves and eating from your backpack) you will need lots of drinking water. I'm still not sure how the villagers get their water - it may be from deep drilled wells. The limestone shore is flat and approximately 20 meters high above the sea so you won't find any fresh water springs.
Bring your snorkeling gear or at least a pair of swimming goggles. You won't regret it. Where there are rocks there's sea-life: crabs, fish, plants, cormorants, dolphins, etc. Actually the place is awesome for scuba diving and underwater caving. There's an entire colony of cormorants in a cave that goes more than 30 meters deep under the limestone shoreline.
Fishing is another popular activity - either with a rod or with a spear/harpoon while diving (I've seen divers doing this).
Photography and film-making - bring your photo and video gadgets coz there's a lot to shoot. I improvised a wrist mount for the GoPro HD camera out of the head strap - I rolled the elastic straps a few times around my wrist and held the plastic square on which the camera was mounted. When I had to come out of the water (climb on cliffs), I slid the strap on my arm just after the elbow joint as to have the camera protected.
How To Master Your GoPro Camera Like a Pro (even if you don't know anything about shooting or editing videos)
+ How To Make Money on YouTube (Bonus Section)
Don't freak out! I hate spam too.
Your email is safe with me.
+ You'll Also Get These Extra (FREE) Materials:
How To Get Free Outdoor Gear from Sponsors
How To Make Viral Videos - 3 Lessons from Devin Graham (King of YouTube)
3 Cool Ways To Get Paying Clients as a Videographer
How To Be Creative without The Pressure
You Don't Have To Struggle To Learn How To Shoot and Edit GoPro Videos on Your Own. Take The GoPro Video Editing Course and Easily Publish Your First Video without Mistakes.
Hi! My name is Constantin and I'm an outdoorsy dude who enjoys shooting and editing action sports videos. Here you can learn GoPro tips, how to build DIY video gear and you can also read our outdoor gear reviews. More about me here.
Testimonial
GoPro (the company) on my DIY Steadicam Tutorial:
"An advanced How To for the hardcore film makers"