
Why a Home Made Fingerboard is Better than a Resin Commercial Hangboard
Everything about building a hangboard + training plans now in my guide:
How To Build Your Own DIY Climbing Hangboard without Drilling The Wall Above Your Doorway
Downhill MTB Free T shirt Design - Dirt Rider
Download this downhill mountain bike T-shirt design in vector format


My suggestion for printing your downhill bike T-shirt or hoodie
You should know that some T shirt printing services such as Spreadshirt accept only three colors designs for T shirt prints. This is especially true for certain printing techniques. I don't think this design qualifies - it has more than three colors - so if you want to have it printed on your T shirt by Spreadshirt you should edit it and change some colors. If you want to have it just as it is, then you can opt for digital transfer printing method (see videos below).
You can open and edit vector graphics with Inkscape. You will be able to modify each aspect of the design - shape, color, gradient, shadow - without loosing resolution quality. Vector drawings have "infinite resolution" that's why they are preferred in printing.
| An Open Source vector graphics editor, with capabilities similar to Illustrator, CorelDraw, or Xara X, using the W3C standard Scalable Vector Graphics (SVG) file format. Inkscape supports many advanced SVG features (markers, clones, alpha blending, etc.) and great care is taken in designing a streamlined interface. It is very easy to edit nodes, perform complex path operations, trace bitmaps and much more. We also aim to maintain a thriving user and developer community by using open, community-oriented development. Source: Inkscape.org |
Ride on!
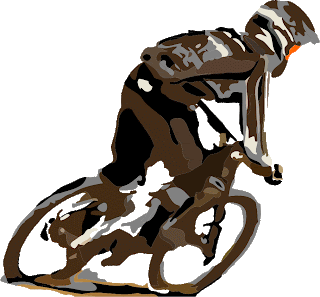
Free BMX T shirt Design in Vector Format - Urban Rider

My suggestion for printing your BMX T-shirt and hoodie


Keep doing your bike stunts!
Trail Running & Mountain Biking - CPNT Brasov Promo Video - GoPro HD - DIY Glidecam
Here's a short promo video that I made for my friends in CPNT - youth and sport club in Brasov. This clip shows two of their outdoor activities: trail running and mountain biking. They also engage into climbing, trekking and other mountain sports but this action video is supposed to be a digital brochure for their mountain running competition - Marathon 7500 in Bucegi mountains.

If you happen to know any company that you think might sponsor this event please shoot me an email so I can hook them up with CPNT. The more sponsors the event has, the better the prizes you'll get if you hit the podium!
The video was shot with GoPro® HD Video Camera
| If you can't import or you can't edit your GoPro HD videos, try to convert the MP4 files to MOV or AVI with MPEG Streamclip. |
Go trail running and show us what you got!
What To Eat as a Mountain Biker & Climber - Steamed Rice, Tuna Fish and Salad

It has been stressed a lot all over the place that sportsmen should ingest carbohydrates on a regular basis in order to be able to do their stuff - cycling, trail running, climbing or whatever.
Here I propose a cool meal that you can easily prepare in less that 30 minutes. This meal consists of carbs from rice, protein from light white meat - tuna fish, fibers and vitamins from vegetables. It's a complete and healthy meal that can be part of your nutrition balanced diet.
List of ingredients for two portions of steamed rice and tuna fish (like I'm a chef or something...):
- two rice bags - you can find those in the supermarket - punctured plastic bags/Chinese style rice
- two tuna fish cans (in olive oil/in brine/in tomato sauce)
- cucumber
- tomatoes
- lettuce
- onion
- green pepper
- radish
Add approximately two liters of water and some salt in a pot; put it on fire and add the rice bags when the water is boiling hot. Keep the rice boiling for 15 minutes while you're preparing the salad.
When the rice is boiled - the bags are almost popping - take the bags out of the water, hold them 30 seconds above the pot as to let the water drip out and put them on a plate.
Rip the bag and let the rice out - it's steaming and it's looking nice. Add some butter on it and also some soup base (Vegeta, Knorr or other mixture of spices and various vegetables). Open the tuna can, add it to the rice, add the salad and you're good to go!
This is a cheap meal but this doesn't mean you're not eating healthy. The carbohydrates will give you the power you need for your strenuous exertion. The protein in the tuna fish will build up and replace used muscle tissue. And the fibers and vitamins form the salad will keep you fresh and healthy. Nothing is cooked too much (apart from the rice being boiled) so you won't loose any nutritional value from this food.
The pictures below describe the process of preparing this sportsman's meal.
Eat well and go outdoors! Cheers!


DIY Glidecam - Steadicam Update: Wing Nuts
Test Video - Shot with My DIY Steadicam
Everything I know about building a DIY steadicam is now is in this new guide. Learn how to get amazing cinematic video with this cool gadget that you can build using parts from your local hardware store.
If you don't like the material, no worries. I'll give your money back and you get to keep the guide. Guaranteed!
---

-----
Since I'm no longer selling the DIY Highball steadicam, you may wanna check out these other camera stabilizers. Click on any picture.
Check out the stabilizers on Amazon Canada, Amazon.UK and Amazon.DE.
-----
This post completes my first article about how to build your glidecam for shooting outdoor videos.
I recommend you use wing nuts for fast adjustments of your DIY glidecam. This is especially helpful when you want to change the camera on the top of the system - the glidecam must be rebalanced with every camera. The wing nuts will allow you to add more weights (washers) and to loosen the bolts when you need to slide them in their channels. The balance of the rig can be fine tuned better by sliding the weights than adding additional weights.
Another thing you can do faster with the wing nut setting is to lower or raise the gravity center of the glidecam. I do this by changing the position of the bottom plate (first picture below) closer or further to/from the gimbal. I simply loosen the nuts and slide the plate on the threaded bar, then I fix it in place tightening the wing nuts against each other, holding the plate between them.


 Go outdoors and shoot your adventures!
Everything I know about building a DIY steadicam is now is in this new guide. Learn how to get amazing cinematic video with this cool gadget that you can build using parts from your local hardware store.
If you don't like the material, no worries. I'll give your money back and you get to keep the guide. Guaranteed!
 |
|
 |

-----
Since I'm no longer selling the DIY Highball steadicam, you may wanna check out these other camera stabilizers. Click on any picture.
 |  |  |
-----
This post completes my first article about how to build your glidecam for shooting outdoor videos.
I recommend you use wing nuts for fast adjustments of your DIY glidecam. This is especially helpful when you want to change the camera on the top of the system - the glidecam must be rebalanced with every camera. The wing nuts will allow you to add more weights (washers) and to loosen the bolts when you need to slide them in their channels. The balance of the rig can be fine tuned better by sliding the weights than adding additional weights.
Another thing you can do faster with the wing nut setting is to lower or raise the gravity center of the glidecam. I do this by changing the position of the bottom plate (first picture below) closer or further to/from the gimbal. I simply loosen the nuts and slide the plate on the threaded bar, then I fix it in place tightening the wing nuts against each other, holding the plate between them.


Wing-nut and bolt for fixing camera on upper plate

The bolt goes into the threaded hole - tripod mount of the camera


Wing nut, bolt and washers glued together


How To Edit Videos on Music Beats with Your GoPro HD Footage
Update - Check out my most comprehensive tutorial on editing videos: How To Edit GoPro HD Videos - A Complete Workflow

Why take the trouble to edit your videos on music tunes?
Editing your videos "on the beat" will make your clips watchable and memorable. Imagine how would music videos be without the synchronization between the scenes and the tune... Pretty dull I would say.
Dynamic videos work great as teasers, trailers for almost any type of events, competitions, tours etc. Rocking music, like the one in my video, work well for action clips: motor sports, mountain biking, free-ride skiing, climbing. I knew from the first few seconds that I wanted to watch the Honda teaser to the end. Having video scenes rolling out on the melody will simply keep your viewers watching by catching their attention in the very first few seconds.
How To Edit Videos "On The Beat"
- Firstly, you must import your music track within the video editor. You may not have any idea about the outcome but listening to the music and viewing some footage that you shot may bring up good ideas. If you need or want to use more songs then choose each song according to scenes you want to render. For slow motion scenes use soft music, for dynamic and aggressive action use engaging up beats. You wanna have your viewers pumped!
- Zoom in on the tracks. Video editors allow you to "zoom" on scenes - basically allow to expand the segment that represents a scene as to view it in smaller time increments (fractions of a second). This enables you to cut your footage right where you want it - you can analyze it frame by frame and find the spot where you need to cut or trim the scene. For example if you have a mountain bike rider flying through air and want to cut the clip just when the biker reaches the ground then you zoom in on the imported clip and drag the cursor at that particular point. Only the zoom mode can show you the exact time at which a certain event takes place in the video. Editing at such detail gives you full control - fine tuning - over the video.
- Look for pitch changes in the music track. Perhaps you've noticed by now that most video editors show you the pitch graph on the music/sound track. This graph shows you both when the music grows loud/silent and when the pitch of the tune goes high/low. Seeing where the pitch of the sound track changes is key for editing videos on music beats. Scroll the track, find the tune changes and those will be the points where you'll have consecutive scenes - see picture below. Now you don't have to add a new scene with every beat change but where the song has good rhythm it would be nice to have some scenes rolling accordingly. The beat changes can be identified in the graph as visible high and low spikes neighbored by smaller, insignificant spikes.

- Use dynamic scenes if your video shows action. For instance, the climbers in my clip are moving, leaping, swinging, jumping, falling. All this adds up to the urgency of the video. If you have rather static scenes you can also edit on the beat - just be aware of what it is that you want to convey with your video.
- Use short scenes. This time we're talking less than a second scenes. Short scenes will enable you to do two things: keep your movie short (internet surfers have a short attention span) and cover all your footage (a few short scenes from each shooting session will tell the whole story, showing images that were taken in a long time span - a few hours or a few days).
- Have shots from various angles mixed in the video. A sequence of various angle shots will keep your audience curious to see more whereas shots taken from the same perspective will bore the viewers. Keep it interesting.

Go outdoors and shoot your adventures!
Atlas 12 Series Snowshoes Review

If you're into serious winter mountaineering you may have swam through heaps of snow once in a while. Now, in my opinion, the best way to roam the mountains in wintertime is on cross country skis.
However, if you plan to climb walls (mixed - ice and rock) and you don't want to return on the same route then I see snowshoes as the best option for the approach trek. They are lighter and less bulky than skis and can be strapped on your backpack without being inconvenient while climbing.
How To Change Your Blog Design with a Professional Theme in a Few Seconds - Blogger in Draft
If you want to change the theme of your Blogger blog, now it's easier than ever!
Blogger in Draft is a service from Blogger that allows users to test upcoming features of this free blogging platform. You can log in to Blogger in Draft using your Google or Blogger account and benefit from all the new cool stuff that's being prepared.
 Even though the tested features are only available there, the changes you make to the blog's design apply permanently to your Blogspot blog. So before you make any changes, save your current layout if you'd like to switch back to your old template later.
With the new template designer you can:
- create new columns for your blog (two columns or three columns blog)
- create new columns in the blog's footer (split footer column, add extra fields)
- adjust the width of any column by sliding a marker (see the changes take effect in real time)
- add a background image to your blog (choose from lots of quality pictures and patterns hosted on iStockphoto.com - nature, sports, travel, science and other categories)
Here’s what we’re launching today to Blogger in Draft:
Go to http://draft.blogger.com/ to log in to Blogger in Draft. (If you’ve never been there before, Blogger in Draft is just like regular Blogger, except with new, in-development features like this one.) Click on your blog’s “Layout” link to go to the Layout tab. The link to the Template Designer is at the end of the row of sub-tabs.  Source: Blogger in Draft Blog |


With these new design options, Blogger gives you more control over the look of your blog - just like WordPress premium themes. I still wonder whether a blogging platform, given the same content, can make a difference in a blog's traffic... What do you think?
Happy blogging!


