
How To Recover Quickdraws When Climbing Overhanging Routes - Video
Everything about building a hangboard + training plans now in my guide:
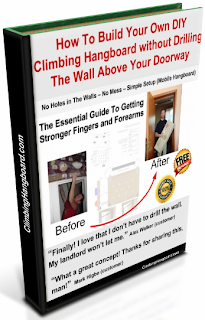
How To Build Your Own DIY Climbing Hangboard without Drilling The Wall Above Your Doorway
How To Build Mountain Bike Trails - Singletrack - Video
Have you ever wondered what's the story behind building mountain bike trails? It's something that you may take for granted but there's serious work and planning for each MTB singletrack out there.

Of course you can build your own trail without going through all the trouble with permits from authorities, forestry people and so on. But by doing so you might do harm that you cannot see. The impact of any human action in a natural environment can be crucial to certain species of wildlife and flora and can also cause soil erosion, ravines, etc.
Below is a collection of videos made by International Mountain Bicycling Association (IMBA) and United States Forest Service (USFS) that teaches you how to build and maintain mountain biking trails - they also published this book. Use these clips as well as the bullet-ed transcripts as a reference in designing your dream MTB course.
Building Sustainable Singletrack Video - Intro
- Mountain biking is one of the most popular activities around the world.
- It offers exercise, adventure, challenge, thrills and solitude.
- There different riding stiles: Cross country riders are looking for long rides to increase their endurance. Downhill riders are seeking speed and technical challenge. Free riders want the thrills and excitement of conquering obstacles.
- Singletrack riding is an exciting outdoor experience that provides a close connection with nature. It takes concentration, skill and physical aptitude but it's also esthetically pleasing.
- A singletrack 14 to 18 inches wide takes you through the geological features of the landscape being also easier to keep from eroding.
- The trails can also be used for hiking and horse riding.
Chapter 1 - Most Important Steps
- Build relationships and gain permission from land owner and/or manager.
- Show them that the trail will benefit them and other people as well - a good and popular trail can bring revenue in the area through tourism.
- Bring a detailed proposal showing the goals and the benefits of the trail. Spend time in the field with the land agency and discuss the obstacles you want to have in the trail and other technical aspects.
- Be patient! It takes time for your trail design to be approved.
- Consider the environmental study that must be done prior to building the trail. This will help preserve wildlife, flora and particular landscape features. Building a legal trail must pass through this process but the convenience of this step being fulfilled is that the trail will get attention, maintenance and support from all parties involved (local authorities, individual cyclists, non profit organizations, etc).
Chapter 2 - Trail Design Mistakes
- Avoid the two design mistakes that cause water to erode trails:
- Building the trail on the prevailing slope (fall line) - water erodes the track and as bikers try to avoid the ruts, the track becomes wider and wider, spoiling the singletrack experience.
- Another design flaw is building the trail on flat terrain - rain water will form puddles and mud which will then be avoided by cyclists thus leading to widening the trail.
- Keep water off the trail and most other thinks will take care of themselves.
Chapter 3 - Designing Sustainable Trails
- Use a contour map and draw your trail, taking the biker to all points of interest like waterfalls, lakes, rocks, scenic overlooks, etc.
- Use loops as to add adventure to your trails. Each loop may have a part that overlaps with another trail of higher difficulty. Easy, wide and accessible trails should be closer to the trail head.
- The key for trail sustainability is to have water run across the trail, not down it.
- The 10% average guideline says that for each uphill and downhill section, the average grade of inclination should be of 10% or less. To calculate this, divide the elevation rise over the run (distance) - e.g. an uphill section of 475 feet elevation that measures one mile in distance (5280 feet): 475/5280=0.9 ~ 10%. Calculate this for each ascending and descending section of your track and keep it below 10%.
- The half rule says that the trail must have an inclination equal to half of the hill's slope. In order to find out the slope of a hill or mountain you need to use a clinometer. Don't use spray paint for marking the line of your trail - use flagging tape instead (it can be removed after the work on the trail is done).
- The maximum sustainable grade states that when a hill slope is too steep you may exceed the 10% average inclination but this is conditioned by the type of soil, amount of rock, annual rainfall and users (traffic). Example: trail grades can be steeper on solid rock but dry soil require gentle grades.
- Add ups and down to your trail - grade reversals. Their purpose is to help water exit off the trail. Look for natural depressions or obstacles that will force the trail to go up and down every 20 to 50 feet. These will also add thrill to the ride.
- To keep water running across your trail, you need to ensure the path has a 5% outslope tread. This means the outer edge of the trail tilts slightly down-slope.
- Avoid sharp zig-zags when designing a trail on a steep slope - the sharp turns disrupt the natural uphill riding flow and cause bikers to skid when cycling downhill. The skid marks cause erosion which you want to avoid at all costs. Instead, you can follow milder slopes and design larger turns (20 feet radius of the curve) having grade reversals both before and after the turn (water escapes).
Chapter 4 - Let's Get Dirty
- Outline the trail with pin flags either in the middle of the track or on the side - make sure to inform the working team about the way you marked it.
- Cover safety issues in the technical meetings. Pay close attention to the circle of death - a man working with his tool shouldn't reach a fellow worker - that is to say space each other out while working on the trail. Wear protective equipment like gloves, hard hats and sturdy boots. Bring food and water with you.
- For easy trails you may want to remove obstacles but for more challenging routes you should leave down logs and rocks as to add the extra push for the rider.
- Clean the corridor by trimming trees and bushes. Leave arching vegetation above the trail for a closer connection with nature. Natural landmarks like small tress left near the edge of the trail will keep bikers within a reasonable speed limit while keeping the trail from becoming wider.
- Dig the trail in a full bench - cutting the whole tread in the hillside. This design is recommended because it creates a stable tread and requires less maintenance.
- Shape the backslope for an even transition form the hillside to the tread. Use a McCloud tool for compacting the trail and the backslope. All the margins should be smooth.
- Outslope the tread - a McCloud tool will lean slightly downhill when placed on the trail - that's how you can measure the outslope.
- Disguise the construction efforts by covering dirt (resulted after digging the trail) with the branches, leaves and grass you got when cleaning the corridor. Make the trail look like it's been there for years.
Chapter 5 - Armoring
- Armoring is a method used to harden section of trails where the soil is too soft or the slope is too steep. It consist of embedding flat rocks into the tread. Define the sides of the armored area with logs or rocks to keep rider on the trail.
- Water crossings can also be done using armoring, especially where the water is shallow. Bridges involve spending money and having engineers in the team - it's more convenient to design the trail to lead through parts of the stream where armoring will suffice.
Chapter 6 - Creating Challenge
- Technical trails don't require mountains. Work with what you have, no matter where you are. Use natural obstacles (rocks, logs, bumps), add exposure and you will design a thrilling trail.
- Create landing zones sloping downward 5% to 15% for drop-offs. Give warnings of the challenges ahead - provide good sight lines or add signs.
- Place high skill level qualifiers at the beginning of the trail as to let the biker know about the type of trail he/she is entering into. This will help the rider asses early on whether the trail is within his/her capabilities.
- A well designed trail with fun contour lines and challenging obstacles will keep riders coming again and again. Make your trail as popular as possible.
Chapter 7 - Maintaining Trails
- A trail needs to be maintained on a regular basis.
- Reopen the corridor by trimming vegetation and removing fallen tress.
- Restore the 5% outslope - remove the excess dirt on the outer edge of the trail. Remember to compact the entire surface.
- Improve water drainage bu building knicks where puddles form. Use foam balls to find out where the water will flow on your track (forming ruts) and where it will stagnate.
- If for some reason drainage problems persist you may consider re-routing your trail.
Chapter 8 - Reclaiming Trails
- Reclaiming portions of damaged trails is as important as designing sustainable singletrack.
- Loosen the dirt at least two inches deep after which add logs, rock, grass (turf), plant trees or shrubs. This will scare off bikers, pushing them to ride the re- route.


 You can buy the book (Trail Solutions) and learn more about building sweet singletrack here.
Wear your helmet!
Climbing Fingerboard - DIY Tutorials & Hangboard Training Tips
Everything about building a hangboard + training plans now in my guide:
How To Build Your Own DIY Climbing Hangboard without Drilling The Wall Above Your Doorway
Climbing Tips for Beginners
Everything about building a hangboard + training plans now in my guide:
How To Build Your Own DIY Climbing Hangboard without Drilling The Wall Above Your Doorway
If you don't like the material, no worries. I'll give your money back and you get to keep the guide. Guaranteed!
 |
|
 | |
|  |  |  |

There is a misconception amongst beginners that in climbing one has to develop strength solely in his/her arms and fingers. This couldn't be further from the truth.
As a beginner climber I remember that I was obsessed with finding the biggest hand holds when in fact I managed to climb even with smaller holds. It basically comes down to technique, footwork, energy conservation and emotion control.
Without further ado let's see what are the aspects you should work on if you've just started your climbing career.
Footwork - Since you won't attack hard routes at first - you will probably climb easy routes in the gym or slabby rock faces outdoor - try to concentrate on using your feet to the highest extent.
To have an idea about how much you need to use footwork in your climbing try a little exercise: climb on a ladder without holding the rods, that is only by stepping and pushing down - use your hands just to keep your balance (you can lean on the ladder but you aren't allowed to grab or pull the rods). If you can do that then you're one step closer to improving your climbing capabilities.
When climbing on a slab you won't have too much choice and you'll inherently use your feet more than your hands, taking advantage of the friction between the rock and your climbing shoes' sole - a technique that is called smearing (read more here).
The thing with footwork is that you have to be aware of it while you're doing it. You should also know that it works best if you step on the footholds properly - you literally have to apply your climbing shoe on the hold, load the hold (transfer some weight on your foot) and push on it as to raise your body higher (from flexed knee to stretched leg).
General fitness of your body is highly essential for climbing and in this case you should be able to do one leg squats. This can be attained trough alternative exercise like uphill running, uphill cycling or simply by doing squats until you can do them with just one leg.
Foot and opposite hand - This is the most common technique you will use in modern sport climbing and since it imitates the ladder climbing it should feel natural. What you have to do is to be constantly looking to get your body ready for the next move by grabbing a hold and using the opposite foot for pairing. Example: If you have your left hand on a jug slightly above your hand, you must look for a good hold on which to step with your right foot - if you want to ascend more in one single move you must raise your foot as high as possible. Pull with your hand and push with your leg - your move is completed when you are standing on your foot (leg fully stretched) and your hand is somewhere at your shoulder level (or below). The free leg is supposed to be dragged on the rock as to maintain your balance while the free arm is reaching for the next hold. You will encounter situations when the only way to pass the crux is to use - say - the right hand and the right foot. You must avoid the opening door effect and either move dynamically to the next hold or offset the hinge effect by placing your left leg laterally below your right foot (which is placed higher).

 Rest position in overhang - image taken from here
- Use your feet more than your hands
- Apply the rule of hand and opposite leg for an efficient ascent
- When hanging, rest with your arms stretched
Enjoy outdoors through climbing!
How To Build a Steadicam - Glidecam for Smooth Video Capture
Test Video - Shot with My DIY Steadicam
Everything I know about building a DIY steadicam is now is in this new guide. Learn how to get amazing cinematic video with this cool gadget that you can build using parts from your local hardware store.
If you don't like the material, no worries. I'll give your money back and you get to keep the guide. Guaranteed!
---
-----
Since I'm no longer selling the DIY Highball steadicam, you may wanna check out these other camera stabilizers. Click on any picture.
Check out the stabilizers on Amazon Canada, Amazon.UK and Amazon.DE.
-----
Everything I know about building a DIY steadicam is now is in this new guide. Learn how to get amazing cinematic video with this cool gadget that you can build using parts from your local hardware store.
If you don't like the material, no worries. I'll give your money back and you get to keep the guide. Guaranteed!
 |
|
|
 |  |
A glidecam is a device used mostly in professional video shooting that enables the camera operator to follow the subject (walk or run) on uneven terrain without transfering any of the bumps to the camera. Since an original Steadicam (trade mark) costs several hundreds of dollars or more, it's more convenient to build your own glidecam on a budget as low as $30.
-----
Since I'm no longer selling the DIY Highball steadicam, you may wanna check out these other camera stabilizers. Click on any picture.
 |  |  |
-----
The result of using a DIY camera stabilizer is smooth footage just like in the movies - adding an artistic touch to your videos.
The model I suggest you build consists of a PVC pipe gimbal, a skate ball bearing, a threaded bar, weight plates made of laminate flooring, bolts, nuts and washers (as weights). All the materials you need for this project are available in any hardware store at reasonable prices - basically each item is pretty cheap.
An easier version to build is the Merlin design - made of a ball joint or an universal joint and a bearing. However, I believe the regular glidecam has more advantages than the Merlin.
I use it mostly with my GoPro HD camera but it can accommodate other type of consumer cameras as well, including compact photo cameras.
DIY Glidecam & Camera Stabilizer Resources
- DIY Steadicam Latest Version - Simple Gimbal Design
- DIY Camera Slider Tutorial & Test Video New
- DIY DSLR Steadicam Tutorial Smart Camera Plate
- Build Your Own Cheap Glidecam - Steadicam First Version
- How To Make a DIY Gimbal from a Wooden Cube and Ball Bearings
- How To Balance Your Glidecam for Proper Video Shooting
For any questions leave a comment or drop me an email - I read each and every one of them.
Shoot your outdoor adventures!
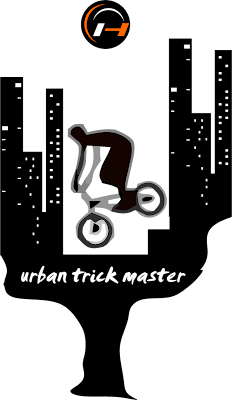
Download a Free BMX Vector Design for Your Bike T-shirt

 Download this vector design (SVG) for your BMX T shirt here or grab it in GIF format (transparent background) by saving this image to your computer
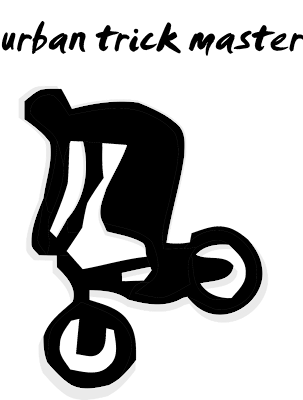 Download this vector drawing (SVG) for your stunt bike shirt here
What is interesting is that most of the vector bike designs you can download for free on Highball Blog where created by playing with graphics software. In other words you have to try in order to get valuable ideas for your bike T shirt designs.
You may wait too long for the perfect idea to pop in your mind and notice that it just doesn't happen... Working, trying, failing will give you more creative ideas than just sitting for ideas.
Good enough is much better than perfect.
You may wait too long for the perfect idea to pop in your mind and notice that it just doesn't happen... Working, trying, failing will give you more creative ideas than just sitting for ideas.
Good enough is much better than perfect.
 Suggestion for printing your BMX bike hoodie and T shirt
Wear your helmet!
How To Add a Favicon To Your Blogger Blog

A favicon is something that you've perhaps seen but didn't know it has a name. That was me a while ago. After a few attempts (trial and error) I managed to add a favicon to Highball Blog and in this post I'm gonna teach you how to do it on your Blogger/Blogspot blog.
Favicons are those small images that you see in the browser's address bar, shown before the URL of a website or blog. Not all websites display them but those who do are more likely to make a favorable impression on the viewer. We've got so used to see logos attached to any kind of venture that favicons are their normal extension on the web - in the browser to be more specific.
Let's get to the point and see...
How You Can Add a Favicon to Your Blogger Blog
Before jumping into technical stuff let's agree that you need to design a logo for your blog. And when I say design I don't mean you have to create a masterpiece in seven colors, gradients and textures. No! It's all about simplicity.If you think your blog should get an original symbol logo then create a logo but in most cases - especially with personal blogs - having your name's initials in a small square or circle will do.
Tips for logo design:
- Work with three colors maximum
- Use solid colors (no gradients, no textures/pattern fills)
- Use simple shapes
- Work with few elements (don't crowd the logo with too many shapes)
- Make sure your logo looks good in black and white too
- Think about it from a branding perspective (make it memorable)
Save your image as PNG file.
Now you need to resize your image. You can do that with Microsoft Office Picture Manager in a few easy steps:
- Open your file
- Hit the Edit Pictures button
- Click Resize (the right sidebar menu)
- Enter 16 in the Custom width x height fields (favicons must be 16 pixels wide/16 pixels tall for a proper display in the browser's address bar)
- Click OK
- Save your new image with a different name as to not replace it with the original one (Save as... - name-of-file-16-px.png)

Once you have the new resized image you must host it somewhere online. I recommend Media Fire as it's free, reliable and convenient. Create an account and upload your image. Note that you can use Media Fire for sending files to people or for storing your own important documents - it can be an alternative to Dropbox (not that smart as Dropbox but good enough for this purpose).
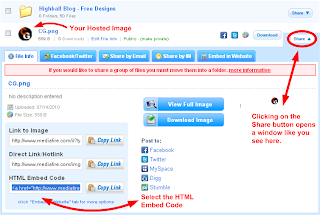
After you upload the picture to Media Fire go through the following steps:
- Click on the Share button to see all the sharing options
- Copy the HTML Embed Code and paste it into a Notepad blank document
- Look for the piece of code that looks like this: img src="http://www.mediafire.com/imgbnc.php/325ea55e0637fca99dc362b7970078862g.jpg"
- This particular piece of code (purple line) is the link of your image hosted on Media Fire; img src stands for Image Source
- Copy the code within the inverted commas and paste it lower in your Notepad document as you'll need it in the next step. Please note that your code will be different that mine!
- See image below (share options in Media Fire)
In this step you will add the favicon to your Blogspot blog.
- Log into you Blogger account - go to Design/Edit HTML
- Search the end of the title tag, that is </title>
- Paste this code just after </title>: <link href="%27http://catascouts.googlepages.com/HighballblogsymbolPNG16.png%27" rel="'shortcut" type="'image/png'/">
- Replace the red line with your favicon source code (purple line) that you saved earlier in the Notepad document
- Click Save Template
Note that Highball Blog runs on Three Column Minibox Template which I downloaded from here. If adding the favicon doesn't work on your current blog theme, you may find other solutions in these Google search results.
| This article will be added to the list you can see in the right sidebar called Tutorials for Bloggers. If you think these technical posts on blogging belong somewhere else, let me know and I'll create a separate blog just for that. I tend to mix these two topics - internet and outdoor activities - as I love them both. :-) |
Happy blogging!
Why You Need a Lockout MTB Suspension Fork

Serious mountain bikers usually choose mountain bikes with a lockout front suspension fork. But then again serious cyclists in general are more into cycling than they are into gear. What I mean is you don't have to own the perfect bike to be a good cyclist.
The lockout is a switch/lever on one of the tubes in your MTB fork that once turned makes your fork rigid. Some forks have what is called remote lockout - the lever is placed on the handlebar and thus you don't need to reach down at the fork to operate it. A cable connects the handlebar lever with the actual lockout switch on the top of the fork tube.
What Are the Benefits of Lockout MTB Fork
Having a rigid fork (suspension locked) is useful when riding uphill on even terrain. In this situation you usually get up from the saddle and push on the pedals using your own weight. If you have a regular suspension fork most of your effort dissipates in the fork itself. Instead of transforming your work on the pedals in covered distance you waste energy by allowing the fork to glide back and forth with each push you make.A rigid fork allows you to transform your pedaling into traveled distance. When riding out of the saddle you won't bounce (as with the suspension on) and you will gain distance more efficiently.

If you ride in the city and cycle in a soft manner (on the saddle) you may want to leave your suspension on as to decrease the breaking distance. Basically the same thing happens here - the kinetic energy is being absorbed by the fork enabling you to stop faster and keep permanent contact between your bike's wheels and the road.

Let Nalle Climb T-shirt Design in Vector Format - FRFM Controversy
Everything about building a hangboard + training plans now in my guide:
How To Build Your Own DIY Climbing Hangboard without Drilling The Wall Above Your Doorway
If you don't like the material, no worries. I'll give your money back and you get to keep the guide. Guaranteed!
You Also Get 3 FREE Bonuses - Climbing T Shirt Designs:
---
I have no idea what it feels to work on a route for the first ascent and then have some other climber come in and steal my glory. Climbing is too much fun to be reduced to glory and first ascents. I'm not into climbing for first ascents - I go for red point, self humiliation through falling, adventure, fun, friendship and sometimes injuries. And that's substantial stuff!
However I do have a slight idea about how Nalle felt when he was asked not to climb First Round First Minute. He got all excited and said something like: "Oh sure, Chris! I don't have any problem with you supposedly being the best climber in the world and not letting anyone to try your world class projects (Jumbo Love included) because you wanna have the first ascent and because the guys from Big Up did so much video shooting that would be embarrassing not to have the complete ascent footage. And then of course why should we let the world feel that other strong climbers are rising when in fact there is just one guy who's the strongest and that's you, Chris. I'd love to let you have all the first ascents until you will be kind and generous (as many strong climbers are) as to let others (if not invite them) to come and climb on your projects before you actually complete them.
I know that this is not a competition and I guess it's normal to ask others not to climb on a certain route because you've put so much passion and work into it (unlike us who flash everything in contempt) and it's simply not fair that others may have a chance of working hard on the same route that you are working on. That would be a sacrilege!
I'm sure that Jean-Christophe Lafaille would have asked you to leave Biographie untouched when you started working on it but I guess he was on vacation or something. You would have been totally okay with that - you're a great guy (unlike many of us who have the audacity of meddling with your projects).
I mean, it's like in business. If a company made billions in profit and for some reason got greedy or foolish and started sinking, going bankrupt and all that then it's normal for kiss ass governments to help those companies by bailing them out with taxpayer's money. Why let new companies grow and show they got the chops?! That's just silly! (Smother them with taxes and help the big guys!)
So Chris, you go on and conquer what you have to conquer. I guess I could knock myself out elsewhere.
You take care now and make sure to have the first ascent title superimposed on the video. That would totally make sense!
And don't fear of being accused of red tagging. Coz red tagging means hanging a red sling in the first bolt of a climbing route as to tell other climbers that the route is reserved for the guy who bolted it. You never did that. By merely asking people not to climb on your routes you have nothing to do with red tagging. It's just standard procedure in our world, right?
I'll definitely remember this as a joyful experience. Cheers!"
 Support climbing as a fun way of life and oppose red tagging by printing
this design on your climbing T shirt.
Download it in vector format (SVG) here.
 My suggestion for printing your "Let Nalle Climb" T shirt
How To Build Your Own DIY Climbing Hangboard without Drilling The Wall Above Your Doorway
If you don't like the material, no worries. I'll give your money back and you get to keep the guide. Guaranteed!
|
|
| |
| | | |

I have no idea what it feels to work on a route for the first ascent and then have some other climber come in and steal my glory. Climbing is too much fun to be reduced to glory and first ascents. I'm not into climbing for first ascents - I go for red point, self humiliation through falling, adventure, fun, friendship and sometimes injuries. And that's substantial stuff!
However I do have a slight idea about how Nalle felt when he was asked not to climb First Round First Minute. He got all excited and said something like: "Oh sure, Chris! I don't have any problem with you supposedly being the best climber in the world and not letting anyone to try your world class projects (Jumbo Love included) because you wanna have the first ascent and because the guys from Big Up did so much video shooting that would be embarrassing not to have the complete ascent footage. And then of course why should we let the world feel that other strong climbers are rising when in fact there is just one guy who's the strongest and that's you, Chris. I'd love to let you have all the first ascents until you will be kind and generous (as many strong climbers are) as to let others (if not invite them) to come and climb on your projects before you actually complete them.
I know that this is not a competition and I guess it's normal to ask others not to climb on a certain route because you've put so much passion and work into it (unlike us who flash everything in contempt) and it's simply not fair that others may have a chance of working hard on the same route that you are working on. That would be a sacrilege!
I'm sure that Jean-Christophe Lafaille would have asked you to leave Biographie untouched when you started working on it but I guess he was on vacation or something. You would have been totally okay with that - you're a great guy (unlike many of us who have the audacity of meddling with your projects).
I mean, it's like in business. If a company made billions in profit and for some reason got greedy or foolish and started sinking, going bankrupt and all that then it's normal for kiss ass governments to help those companies by bailing them out with taxpayer's money. Why let new companies grow and show they got the chops?! That's just silly! (Smother them with taxes and help the big guys!)
So Chris, you go on and conquer what you have to conquer. I guess I could knock myself out elsewhere.
You take care now and make sure to have the first ascent title superimposed on the video. That would totally make sense!
And don't fear of being accused of red tagging. Coz red tagging means hanging a red sling in the first bolt of a climbing route as to tell other climbers that the route is reserved for the guy who bolted it. You never did that. By merely asking people not to climb on your routes you have nothing to do with red tagging. It's just standard procedure in our world, right?
I'll definitely remember this as a joyful experience. Cheers!"
 Support climbing as a fun way of life and oppose red tagging by printing
this design on your climbing T shirt.
Download it in vector format (SVG) here.
 My suggestion for printing your "Let Nalle Climb" T shirt
Download Free MTB Vector Designs for Your Downhill T-shirt or Hoodie
 Download this MTB design for your bike T shirt in vector format (SVG) here
or click on the image to buy a MTB shirt in the Highball Store
Designing your own cycling T shirt or jersey is not that hard. Check out a previous article where you can learn how to design your mountain bike T shirt using computer graphics software like Inkscape, Microsoft Visio and Vector Magic.


Win Cool Outdoor Technical Gear from GoLite - Easy Sign Up with Email and Zip Code

| Before getting too excited please note that this contest is for USA residents only!!! I know... But if you have friends or relatives living in the United States let them know about it and split the prize. :-) |
It appears to be a sort of a tombola as all you need to do is to sign up on GoLite website by entering your email address and zip code. You can win all sorts of outdoor adventure gear for camping, trekking, trail running like:
- T shirts
- Backpacks
- Tents
- Waterproof Jackets
- Softshell Jackets
- Water Bottles
- Caps
Contest Period: The Contest begins at 12:00:01 a.m. CT on Monday, June 21, 2010 and ends at 11:59:59 p.m. CT on Tuesday, September 21, 2010.They'll select a winner each day for 93 days, that is 93 prizes. The gear you can win looks like this:
Eligibility: The Contest is open only to legal residents of the fifty (50) United States (and D.C.) who are at least eighteen (18) years of age or older at the time of entry.
Source: Official Rules GoLite Up Your Day


I've found out about this contest on Midwest Multisport Life.
Good luck to all participants!
GoPro HD Camera Review

Update: The GoPro HD 2 Hero has become cheaper as the new GoPro HD 3 was released.
However, the Hero HD is no longer available in GoPro store - perhaps they stopped manufacturing it.
 I've been using the GoPro HD camera for about half a year now and I believe we've become pretty intimate during all this time. I know her and she knows me. We go together almost everywhere and we have a good time.
What you may wanna know is where to buy the cheapest GoPro HD. If you live in Europe you would be surprised to learn that it is cheaper to buy it directly from the GoPro store or from Amazon.
Basically when buying from European stores, the US price (in dollars) transforms in Euros plus some taxes, thus you end up paying more - at least that was the case when I was looking to buy mine (January 2010). It's gotten cheaper now as it's no longer a novelty.
Free Climbing T-shirt Design in Vector Format - I Love Crimpers
Everything about building a hangboard + training plans now in my guide:
How To Build Your Own DIY Climbing Hangboard without Drilling The Wall Above Your Doorway
If you don't like the material, no worries. I'll give your money back and you get to keep the guide. Guaranteed!
|
|
| |
| | | |
 Download this design for your climbing T-shirt in vector format (SVG) here
Getting your fingers strong for crimpers takes time and patience. Before each training session you must warm up thoroughly and work your way slowly as to get stronger on small edges. Only then you will be able to say you love crimpers.
When training on a hangboard you may wanna alternate your crimp grip with open handed grip making sure to use more of the latter. An open handed grip is far better and less prone to injure your fingers/tendons even when exercising pull ups and dead hangs on all types of holds.

 My suggestion for printing your climbing or bouldering T shirt and hoodie
Drawing of climber holding a lateral crimper with his right hand and chalking with his left h and - made by Gabriel who's working on his new artwork website - Zdbaw. Check out his other work and feel free to ask him to draw a custom design for you - it can be logo design, T shirt design or even a comic book. He also designed the icons in Brasov Rock Climbing Guide Book. and - made by Gabriel who's working on his new artwork website - Zdbaw. Check out his other work and feel free to ask him to draw a custom design for you - it can be logo design, T shirt design or even a comic book. He also designed the icons in Brasov Rock Climbing Guide Book. |
Go climbing!


