If you don't like the material, no worries. I'll give your money back and you get to keep the guide. Guaranteed!
Printable PDF document
Instant Digital Download
Construction Schemes and Detail Pictures
3 Hangboard Versions To Choose From
Acess To My Video Tutorials
Sequenced Training Schemes
60 Days Money Back Guarantee
Prompt Refunds No Questions Asked
One Time Payment / No BS
+ 3 Extra Bonuses (see below)
You Also Get 3 FREE Bonuses - Climbing T Shirt Designs:
Deep Water Solo T-shirt
Highball Bouldering T-shirt
Top Rope Forbidden T-shirt (Funny)
---
Download this design for your climbing T-shirt in vector format (SVG) here
Getting your fingers strong for crimpers takes time and patience. Before each training session you must warm up thoroughly and work your way slowly as to get stronger on small edges. Only then you will be able to say you love crimpers.
My suggestion for printing your climbing or bouldering T shirt and hoodie
Drawing of climber holding a lateral crimper with his right hand and chalking with his left hand - made by Gabriel who's working on his new artwork website - Zdbaw. Check out his other work and feel free to ask him to draw a custom design for you - it can be logo design, T shirt design or even a comic book. He also designed the icons in Brasov Rock Climbing Guide Book.
Download this drawing for your trial bike T-shirt in vector format here.
The Bunny Hop is in cycling what is the Ollie trick in skateboarding. Sometimes cyclists refer to this trick as the Ollie - so no matter what sport we're talking about it's basically the same thing: trying to get airborne with your bike (or skateboard) as to fly over an obstacle.
I'm still struggling with it...
If you wanna learn how to do it you must follow two pieces of advice:
Learn from those who can do it - either in person or from video tutorials
Practice until you do it right
Below are three videos that are supposed to teach you how to do the Ollie or the Bunny Hopbike trick
My suggestion for printing your BMX/trial bike T-shirt and hoodie
This bike T shirt design was obtained from a vectorized photo taken by George Stroie (nickname: Bivuacu) - climber, video producer, web designer running Bivuac Media company.
What we normally know to bring health and physical fitness - cycling - was banned for "health and safety" reasons in Black Hawk, Colorado.
The benefits of cycling seem to be unimportant for the officials of Black Hawk and thus they decided that car traffic is a priority as it brings clients in the local casinos. Profits for a handful of casino owners and loss for thousands of clients who come to gamble are priced higher than fresh air, true health and the well being of sport lovers.
Sadly while the gambling industry creates and concentrates wealth in the hands of few people it also feeds a terrible addiction which often causes despair, divorce, insanity and ultimately poverty. In the long run there's no way this will bring any good...
This is a call to all cyclists and/or bloggers who want to support the movement:I suggest you gather in huge numbers and organize Critical Mass in Black Hawk on 30 July 2010 and prove once again that We Are Traffic!!!
You may want to rehearse flooding the streets with bicycles in Black Hawk before 30 July. I'm sure you want it to be perfect! ;-)
Pro-cycling groups are getting ready to challenge the even bigger danger here than cycling - the precedent of such a ban on bikes.Gist.org
If you don't like the material, no worries. I'll give your money back and you get to keep the guide. Guaranteed!
Printable PDF document
Instant Digital Download
60 Days Money Back Guarantee
Prompt Refunds No Questions Asked
One Time Payment/No BS
2 FREE Bonuses:
How To Build a DIY Camera Slider
3 Ways To Get Clients as a Videographer (you'll be surprised to find out what the first method is...)
---
Update: I posted a new article showing you how to mount your GoPro camera on your bike fork using the helmet mount. Everyone these days is interested in either how to make more money or how to spend less money. This post will help you accomplish the latter. If you bought or intend to buy the GoPro HD camera you may not need the Roll Bar Mount ($30) or Handlebar Seat Post Mount ($20) because you can replace them both with the helmet mount that comes in the package. Of course you will need to pull a little harder on those straps in order to get a good fix but that's okay for an improvisation mount. The angle shots you can get depend on your ability to mount the action camera all over your mountain bike - naturally, one place at a time. :-) You only have to carry the helmet mount and the small two-piece arm for implementing the tips below. How To Improvise GoPro Camera Mounts for Your Mountain Bike Using only the Helmet MountLateral mount on bike frame, on what is called the down tube. Strap the helmet mount either directly on the tube or use the bottle cage for passing the straps around the thin metal profile. You can have the camera pointed forward - which is great for shooting the road/single-track ahead and the suspension fork at work - or backward - which is cool for shooting the landscape you leave behind, your lower legs and your feet pedaling. Lateral rear mount on the seat stay and chain stay tubes. This mount is pretty close to the wheel so make sure the loose ends of the straps are knotted or folded as to not be caught in the spokes in any way (don't let them hang freely). Point the camera backwards or forward or even upwards (oblique - this way you can be within the footage frame - you're the star). The moving wheel and the speedy spokes will create an interesting video to watch. You can also bend the small goose-neck arm in order to have the camera below the chain stay, closer to the ground. The upside down footage will be rotated 180° later in your video editor. Camera mount on top tube. In some bikes the top tube has three small guiding tubes for the metal cables in the rear brake, the front and rear derailleur. These small tubes, the ones below the saddle, are the ones we're referring to. Place the helmet mount on these tubes and the padding material (soft spongy rubber) under the plastic mount will adhere and embrace the tubes granting a firm hold for the camera. If you place the mount slightly offset (not perfectly centered) you will get one arm of the suspension fork in your bike clip. Lateral mount on the head tube and down tube. The straps go between the top tube and the down tube and around the head tube in variant No. 1. In variant No.2 one strap goes under the down tube and gets out to meet the helmet mount between the head tube and down tube while the other strap starts from under the down tube and wraps the head tube. If I got you confused (with all those tubes) disregard the explanations and study the pictures below. You can get front shots, lateral shots (point the camera outwards, perpendicular on the down tube tube) and back shots. Seat rails mount (under the saddle). Strap the vented helmet mount around the seat rails under your mountain bike's saddle. Slide the camera onto the mount and you're good to go. Flip the footage in your video editing software. Upside down mount on down tube. Strap the mount on the down tube, under the frame. The camera can be fixed into place with or without the small arm (footage may be shaky when shot with small arm due to amplification of trepidations - not the case when cycling on smooth surface). Try to shoot upwards for capturing yourself and your bike contrasting against the sky - that's cool! There you have it. No need to buy any additional mounts - just use what you have already and do your thing. Extra tip: It's advisable to carry a screwdriver or a multi tool for tightening the screws in the joints of the camera arm. Turning the knobs by hand is not enough. You may easily reach 30 miles per hour while speeding downhill on the single-track - the camera mount must be solidly fixed in place.
I didn't come up with these ideas. I'm not that smart. These were suggested by fellow blogger and mountain biker Mihai Siman and by Sorin Ciribasa.
Oh...and please excuse my dirty bike. Didn't have the time to clean it. :-)
I'm fortunate enough to be loved by my sweetheart. She cooks for me sometimes (especially if I do the dishes, sweep the floors, feed the cat, clean the dust off the furniture and do other manly domestic work). But otherwise I a man in the house and I can go climbing and cycling whenever I want (after I do the dishes, feed the cat, sweep the floor, etc).
If you don't enjoy the freedoms that I do you're missing out a lot!
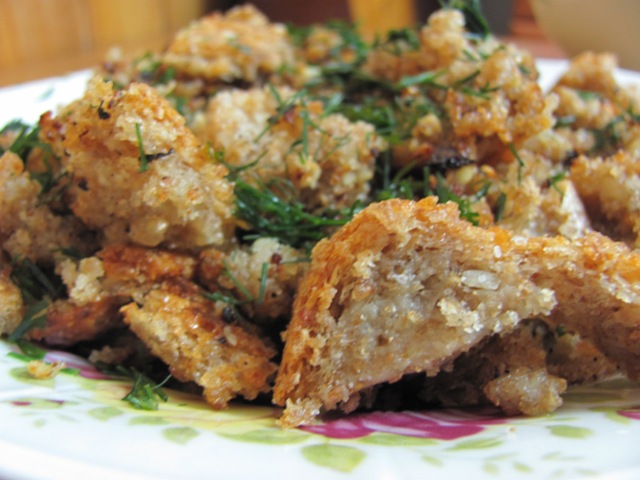
So here's a fast and easy meal you can prepare without compromising your cycling oriented nutrition - bread crumbs with garlic and dill. Now...the only reason I could enjoy this was because I was a good boy and did all the manly work in the house. I suggest you either be a good boy like me and hope that your sweetheart will notice (and reward you with bread crumbs) or you can simply be a man about it and prepare the meal yourself (in the kitchen that is - a man in the kitchen... a true man...).
How to Make Garlic Breadcrumbs
You will need a few slices of whole grain bread, four garlic cloves, butter, olive oil, half a lemon, fresh green dill and salt. The wholemeal you can get in specialized bakeries or even in supermarkets these days. We own a home bread machine and we make it ourselves adding all kinds of seeds to it - sunflower, poppy, sesame, brown flax seed.
Cut the slices of wholemeal into small pieces/cubes.
Stir bake them in a Teflon pan, on a medium/small flame, (no oil, no salt) until they get brownish .
Add some butter (a table spoon) on the crumbs - add it in small portions. It's important that the butter melts on the bread instead of melting by touching the hot pan.
Stir them for another minute with the butter melting. Add olive oil. Again the oil should be poured on the crumbs and not in the pan (as much as this is possible).
Add the garlic pulp (made with garlic smasher). Keep stirring for another two minutes.
Add the lemon juice and the chopped dill.
Add salt.
You can then enjoy this as a meal in itself or you can add the bread crumbs to a salad or serve them with a light vegetable soup.
What you'll get from this meal is:
carbohydrates - No. 1 daily fuel for your muscles and brain
Coz if you are, fat that is, you're not the only one.
I myself gain and consequently struggle to loose about 2 kilos (4.4 lbs) per week so I feel fat pretty often. :-) That's because I like to indulge myself with pork - as you can see in the MTB video "And Mustard Please..."
What you can do for loosing weight is what the Fat Cyclist did for himself:
I had known I needed to lose weight, but hadn’t really done much about it. As I pushed my bike up the road, I realized I had not tried one very successful diet tactic: humiliation. I resolved to start a blog, embarrassing myself by proclaiming my weight on a daily basis, no matter how bad I was doing.
I urge you to read Fatty's blog here and start getting in shape. You can also bring your contribution to the fight against cancer by riding 100 Miles of Nowhere.
My mountain bike downhill video where I get fat...
How To Master Your GoPro Camera Like a Pro (even if you don't know anything about shooting or editing videos)
+ How To Make Money on YouTube (Bonus Section)
Don't freak out! I hate spam too.
Your email is safe with me.
+ You'll Also Get These Extra (FREE) Materials:
How To Get Free Outdoor Gear from Sponsors
How To Make Viral Videos - 3 Lessons from Devin Graham (King of YouTube)
3 Cool Ways To Get Paying Clients as a Videographer
How To Be Creative without The Pressure
You Don't Have To Struggle To Learn How To Shoot and Edit GoPro Videos on Your Own. Take The GoPro Video Editing Course and Easily Publish Your First Video without Mistakes.
Hi! My name is Constantin and I'm an outdoorsy dude who enjoys shooting and editing action sports videos. Here you can learn GoPro tips, how to build DIY video gear and you can also read our outdoor gear reviews. More about me here.
Testimonial
GoPro (the company) on my DIY Steadicam Tutorial:
"An advanced How To for the hardcore film makers"



 Download this design for your climbing T-shirt in vector format (SVG) here
 My suggestion for printing your climbing or bouldering T shirt and hoodie
 and - made by Gabriel who's working on his new artwork website - Zdbaw. Check out his other work and feel free to ask him to draw a custom design for you - it can be logo design, T shirt design or even a comic book. He also designed the icons in Brasov Rock Climbing Guide Book.